The magnitude of the induced EMF is not constant but depends on several factors, including the strength of the magnetic field, the speed of relative motion between the conductor and the magnetic field, the number of turns in the coil, and the area of the conductor exposed to the magnetic field. Understanding these factors is essential for improving the efficiency and performance of electromagnetic devices. This article examines the key factors that affect the magnitude of induced electromotive force and explains how each factor influences the amount of EMF generated.
Electromagnetic induction is the process by which an electromotive force (EMF) is generated in a conductor when it experiences a change in magnetic flux. This phenomenon, discovered by Michael Faraday, forms the basis of many electrical devices such as generators, transformers, and electric motors.
The amount of current produced from changing magnetic flux depends on a number of factors which includes:
Rate of change of magnetic flux
strength of magnetic field
number of turns in a coil
i. Rate of change of magnetic flux
The faster the rate of change of magnetic field, the higher the magnitude of the induced current.
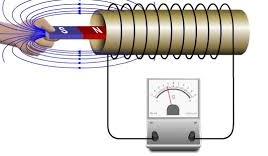
Consider a coil of about 200 turns of a wire, sensitive galvanometer and a magnet arranged as shown in figure below.
To investigate how rate of change of magnetic flux, you move the magnet towards the coil and away at various speeds such as very fast, moderately fast and slowly.
Advertisement
You observe that the faster the magnet is moved to and from the coil, the higher the deflection on the galvanometer. This shows that induced EMF is highest when the rate of change of magnetic flux is highest.
Magnetic flux could be interpreted as the number of magnetic field touching the coil at any given moment.
Explanations
Magnetic flux Φ is the strength of magnetic field threading a given area.
The magnetic flux Φ changes when the magnet is withdrawn from the coil where a faster withdrawal gives rise to a higher rate of change in magnetic flux linking the coil which then gives an increased induced Electromotive force(e.m.f)
see the diagram below that shows magnetic field lines:
ii. strength of magnetic field
Moving a stronger magnetic towards or away from the coil causes increase of the induced current when the speed of movement remains constant.
Consider a u-shaped electromagnet and a variable resistor connected to a circuit shown such that an electromagnet can have it’s strength varied by changing current passing through using the variable resistor.
After the setup, you can do the following to investigate the current induced with strength of the magnet:
Adjust the variable resistor so that minimum current flows.
Move the conductor PQ in a direction perpendicular to the magnetic field of the electromagnet and note deflection on the galvanometer.
change values of current and record corresponding readings on the galvanometer when wire cuts across the magnetic field.
Observations
Whenever current through the ammeter is increased, a greater deflection is obtained on the galvanometer when the conductor wire cuts across the magnetic field.
Explanations
Higher current passing through a coil of wire leads to a stronger electromagnet that will produce stronger magnetic field .
We can therefore conclude that the magnitude of the induced current is directly proportional to the strength of the magnetic field from which it is being produced.
iii. number of turns in a coil
If all other factors are held constant but the number of turns of wire on the coil increased, the induced current is observed to increase proportionately to increased number of turns.
Advertisement
Having at your disposal insulated copper wire, sensitive galvanometer, magnet and connecting cables, you make a coil of numbered turns of wire and set up the apparatus as shown
to investigate how number of turns in a coil affects magnitude of the induced emf, do the following:
Insert a magnet in the coil and then withdraw it at a steady speed and then observe and record the maximum reading on the galvanometer.
Increase number of turns on the coil at equal intervals says 50, 100,150,200,250 etc and repeat the above procedure noting the maximum deflection each time.
Observations
Each time the number of turns of the coil is increased and all other factors held constant, a higher deflection on the galvanometer is recorded. The deflection is proportional to the number of turns used.
Explanations
Increased deflection indicates more current is produced in the coil. The induced emf is proportional to the number of turns and so we can say that each turn on the coil induces it’s own e.m.f. The total induced e.m.f is therefore a summation of all emfs produced by individual turns.
Infact by application of calculus, we can be able to express summation mathematically, but we will do that later in more advanced lessons.
Conclusions
Experiments shows that an e.m.f is induced in a circuit whenever magnetic flux linkage changes and the magnitude of the induced e.m.f increases with increase in the rate of change of the flux linkage and the number of turns of the coil.
The observations from experiments can be summarized in a Faraday’s law of electromagnetic induction which states that:
The magnitude of the induced e.m.f is directly proportional to the rate of change of magnetic flux linkage.
Revision Exercise
Electromagnetic Induction Quiz
Instructions: Answer all questions and click “Submit Quiz”.
The direction of the induced current is determined by Lenz’s Law. When a conductor or coil experiences a change in magnetic flux, an electromotive force (emf) is induced in it. This phenomenon is explained by Faraday’s Law of Electromagnetic Induction. However, Faraday’s Law does not indicate the direction of the induced current.
Lenz’s Law states that the induced current always flows in such a direction that the magnetic field produced by it opposes the change causing it.
In this experiment, a centre-zero galvanometer is first used to establish the relationship between the direction of current flow and the direction of galvanometer deflection. This relationship is then applied when studying induced currents in coils and magnets.
Experiment To Determine the Direction of the Induced Current in a Coil
Apparatus
Sensitive centre-zero galvanometer
Variable resistor (rheostat)
Dry cell
Switch
Connecting wires
Aim
To establish the direction of galvanometer deflection with respect to the direction of current flow.
Theory
Before studying induced currents, it is necessary to know which direction of galvanometer deflection corresponds to a particular direction of current flow.
The circuit shown consists of a battery, a rheostat, a switch and a sensitive centre-zero galvanometer connected in series.
When current flows from A to B, the galvanometer needle deflects in a particular direction. If the current is reversed and flows from B to A, the galvanometer deflects in the opposite direction.
This calibration enables the galvanometer to be used later in electromagnetic induction experiments.
Procedure
Set up the circuit as shown in the figure.
Adjust the variable resistor to a high resistance value.
Ensure that the switch is open.
Close the switch briefly.
Observe the direction of galvanometer deflection when current flows from A to B.
Reverse the battery terminals.
Close the switch again.
Observe the new direction of galvanometer deflection.
Record your observations.
Observations
Direction of Current
Galvanometer Deflection
A → B
Needle deflects to the right
B → A
Needle deflects to the left
Conclusion
The direction of galvanometer deflection depends on the direction of current flow.
This information can now be used to determine the direction of induced current when a magnet moves towards or away from a coil.
Virtual Laboratory Simulation
Switch Open
Investigating the Direction of Induced Current in a Coil
When a magnet moves relative to a coil, an electric current is induced in the coil. The direction of this current depends on whether the magnet is approaching or moving away from the coil. This simple experiment helps us understand the relationship between magnetic motion and induced current.
Procedure
Connect a sensitive galvanometer to a coil as shown in the experimental setup.
Move the north pole of a bar magnet toward the coil and observe the direction of the galvanometer’s deflection.
Next, move the magnet away from the coil and again note the direction of the pointer’s movement.
Observation
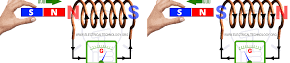
When the north pole of the magnet is moved toward the coil, the galvanometer pointer deflects to the left. This indicates that an induced current is flowing through the circuit in the direction D → C → B → A. see the figure below
When the north pole is moved away from the coil, the pointer deflects to the right. This shows that the induced current now flows in the opposite direction, D → A → B → C.
Explanation
As the north pole of the magnet approaches the coil, the magnetic flux linked with the coil increases. An induced current is therefore produced in the coil. The direction of this current is such that the coil behaves like an electromagnet with its north pole formed at the end nearest to the incoming magnet.
The induced north pole repels the approaching north pole of the magnet. In this way, the induced magnetic field opposes the change that produces it.
When the magnet is moved away from the coil, the magnetic flux through the coil decreases. The induced current reverses its direction, causing the end of the coil nearest the magnet to become a south pole. This south pole attracts the receding north pole of the magnet.
Again, the induced magnetic field acts to oppose the change in magnetic flux. This behavior is consistent with Lenz’s Law, which states that the induced current always flows in a direction that opposes the cause producing it.
Direction of Induced Current in a Straight Conductor
Lenz’s law can also be used to determine the direction of induced current in a straight conductor moving through a magnetic field. Consider a conductor AB placed between the poles of a strong U-shaped magnet as shown in below.
When the conductor is moved across the magnetic field, it cuts the magnetic lines of force and an e.m.f. is induced in it.
As the conductor is moved upwards, the magnetic flux linked with the conductor changes. According to Lenz’s law, the induced current flows in such a direction that the magnetic effect produced opposes the upward motion. It is observed that the current flows from B to A as shown. The
The induced current flows into the page, away from the observer’s eye(B to A)
The induced magnetic field therefore acts to oppose the motion responsible for its production.
When the conductor is moved downwards, the change in magnetic flux occurs in the opposite direction. Consequently, the induced current reverses and flows from A to B as shown.
Induced current out of page (flowing A to B)
The magnetic field produced by this current opposes the downward motion of the conductor.
This experiment demonstrates an important feature of electromagnetic induction: whenever the direction of motion is reversed, the direction of the induced current also reverses. The induced current is always such that its magnetic effect opposes the change that produces it.
The opposition predicted by Lenz’s law is a direct consequence of the principle of conservation of energy. Mechanical work must be done to move the conductor through the magnetic field. This mechanical energy is converted into electrical energy in the conductor. If the induced current aided the motion instead of opposing it, energy would be produced without any external work being done, which would violate the law of conservation of energy.
The direction of the induced current may also be determined using Fleming’s Right-Hand Rule. The forefinger is pointed in the direction of the magnetic field, the thumb in the direction of motion of the conductor, and the middle finger then indicates the direction of the induced current. The direction obtained using Fleming’s rule is always consistent with Lenz’s law.
Interactive Simulation: Lenz’s Law in a Moving Conductor
The following simulation is designed for direct embedding in a WordPress Custom HTML block. It demonstrates a conductor moving vertically through a magnetic field between the poles of a U-shaped magnet. The induced current direction changes automatically according to Lenz’s law.
Electromagnetic Induction: Moving Conductor AB
Motion:Stationary
Current:None
Galvanometer:0
What Is Fleming's Right-Hand Rule?
Fleming's Right-Hand Rule is used to determine the direction of induced current in a conductor moving within a magnetic field. It is a simple yet powerful tool used to determine the direction of induced current in a conductor moving through a magnetic field. Based on the principles of electromagnetic induction, the rule has practical applications in generators, renewable energy systems, and science education. By relating the directions of motion, magnetic field, and current, it helps explain one of the most important processes in modern electrical technology.
Fleming's Right-hand rule states that:
If the thumb and the first two fingers of the right hand are held mutually at right angles with the first finger pointing in the direction of the field, thumb pointing in the direction of motion, then the second finger points in the direction of the induced current.
The rule is mainly applied in electric generators, where mechanical energy is converted into electrical energy.
To use the rule, the thumb, forefinger, and middle finger of the right hand are held at right angles to one another.
Each finger represents a different quantity:
Thumb – Direction of motion of the conductor.
Forefinger – Direction of the magnetic field (from north to south).
Middle finger – Direction of the induced current.
When these three fingers are positioned correctly, the middle finger points in the direction of the current generated in the conductor. From the diagram above part b, Fleming's right rule predicts that the induced currents flows from X to Y. The current must flow in the direction X-Y in order to produce a force to the left opposing the motion to the right.
Example 1
A square loop of a conductor is pulled at a steady speed across a uniform magnetic field as in figure below.
(a) Determine in the figure the direction of induced current in the sides AB, AD, CD and BC, if any.
(b) Explain what happens when:
(i) all the sides are moving in the uniform field and state the potential difference across points AB.
(ii) the side CD leaves the field.
(c) Suggest why in the absence of friction, more force is required to keep the coil moving at a steady speed when side CD leaves the field.
solution
(a)
Sides AD and BC have no induced e.m.f. and hence no induced current, since they are not cutting the magnetic field. Sides AB and CD cut the magnetic field, causing current to flow from B to A in AB and C to D in CD.
(b)
(i) The currents in AB and CD are equal in magnitude and opposite each other. The resultant potential difference across the points A and B is zero.
(ii) Induced e.m.f. in AB sets up a current that takes the path A → D → C → B → A. There is no induced current in side CD.
(c)
The flow of current in AB creates a force that tends to oppose the motion.
Fleming's right hand rule which is also known as dynamo rule is in agreement with the Lenz's law.
The Science Behind the Rule
Fleming's Right-Hand Rule is based on the principle of electromagnetic induction discovered by Michael Faraday in 1831. Faraday found that when a conductor moves through a magnetic field, an electromotive force (EMF) is induced in it. This phenomenon is known as electromagnetic induction.
The induced current flows because the moving conductor cuts across magnetic field lines. The direction of this current depends on both the direction of motion and the direction of the magnetic field. Fleming's Right-Hand Rule provides a simple method for determining this direction without complex calculations.
Phase difference is the angular difference between two sinusoidal waveform of the same frequency and It tells us how much one wave is “ahead of” or “behind” another in terms of their cycles
The word phase in normal usage means any stage in a series of events or in a process of development.
Cambridge University dictionary defines phase as one of the stages or points in a repeating process measured from a specific starting point.
Two Waves can be of the same amplitude but with the different frequencies as shown in figure below.
waves of the same amplitude but different frquency
The wave profile P makes it’s one complete oscillations before wave Q. Wave P has shorter wavelength compared to Q and hence P has higher frequency.
We can also see that P has smaller period as waves with shorter wavelength has smaller period.
Wave P completes it’s first cycle at A while Q finishes it’s first oscillation at B. We can say that P is leading Q. The maximum displacement of the two waves is the same hence they are operating at the same amplitude but different frequency. The two waves are said to be out of phase. Think about two radio receivers tuned to two different stations but with equal volume.
waves can also be of the same frequency but different amplitudes. Think of when we tune in our two radio receivers to the same station and then set them at different volumes
The figure below illustrates two waves operating at same frequency but at different amplitudes.
Waves of the same frequency but different amplitude
One wave is having more displacement than the other. However, they are arriving at the horizontal position simultaneously, as can be seen from the diagram. We say they are in phase.
Pendulum bobs in phase
To further illustrate the concept of phase and out of phase oscillations, consider two identical pendulums. The pendulums have bobs P and Q below.
Masses oscillating in phaseIn-Phase Pendulums
We set the two masses, P and Q in oscillation. We give them some displacement on the left and then releasing them simultaneously. They have equal displacement because we have released at the same time. Therefore, they will pass through the lowest point Y simultaneously as they move in the opposite direction. They attain displacement together at Z and swing back together to complete the oscillation at x.
At any particular moment, the two masses will be moving in the same direction. They will also be at the same level of displacement in their oscillation. We say that the masses are oscillating in phase.
particles in phase difference
When particles in a wave motion happens to be oscillating in the same direction and at the same level of displacement,we say that their oscillation are in phase.
The diagram below have highlighted two positions of particles A and B. The particles are at the same displacement level from the reference line. They are both facing the same direction as indicated by the arrows. The particles A and B are said to be in phase and their distance apart is the wavelength λ of the wave motion whereas time taken to move from A to B is the periodic time T.
Particles in a wave motion can be in phase even if they have different amplitude.
In our previous pendulum oscillation of mass P and Q ; If P is Initially given a larger displacement than Q, the two will oscillate in phase. However, P will always be at a larger magnitude of displacement than Q.
A typical displacement time graph for two wave motions in phase with different amplitudes is shown below.
two waves in phase at different amplitude.
Oscillations out of phase
Consider two masses P and Q displaced from opposite directions from each other as in figure below.
When released simultaneously, they pass through the rest position at the same time. They move in opposite directions. They reach a point of maximum displacement at the same time. However, their maximum displacement is in opposite directions to each other.
Waves 180o out of phase difference
The two objects above are always at the opposite levels of displacement and their oscillations opposite direction to each other and they are said to be in opposite phase.
Wave motions that have same displacement and makes complete oscillations at the same time with their maximum displacements in exact opposite to each other are said to be in 180o phase difference (180o out of phase).
The figure below shows two wave motions at 180o phase difference.
Waves 90o out of phase difference
suppose in our pendulum oscillations we displaces the objects P and Q to X ; we release Q before P and then we release p when Q is exactly at Y. The angle of oscillation between P and Q will be 90o in difference and the resulting oscillation will be 90o out of phase.
The displacement time graph for waves 90o out of phase is illustrated below.
two waves can be out of phase at any angle. We are to see that in our future lessons.
The electromagnetic (EM) spectrum is the range of all types of Electromagnetic radiation. Radiation is energy that travels and spreads out as it goes – the visible light that comes from a lamp in your house and the radio waves that come from a radio station are two types of electromagnetic radiation.
Electromagnetic waves are transverse waves which results from oscillating electric and magnetic fields at right angles to each other.
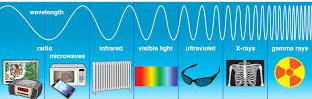
Electromagnetic spectra are arranged in order of their wavelength or frequency. This arrangement forms what is known as the electromagnetic spectrum.
A complete spectrum is shown below:
The figure below shows electromagnetic waves arranged in order of decreasing wavelengths
Properties of Electromagnetic waves
The Electromagnetic waves have the following common properties.
They travel through vacuum(space) with a speed of 3.0 x 10⁸ms-1 . This speed is usually referred to as the speed of light in vacuum and is usually denoted by c.
Do not require material medium for transmission
They are transverse in nature
Electromagnetic waves undergoes interference, reflection,refraction and polarisation effect
Posses energy in different amounts according to the relation E=hf where h is the Plank’s constant given as 6.63 x 10⁻³⁴ Js and f is the frequency
They carry no charge
They are not affected by electric or magnetic fields
Example: calculating energy of a wave
A certain electromagnetic radiation was found to be having a wavelength of 6.5 x 10⁻⁸ m. Calculate the energy it emits.
solution
To calculate the energy of a wave, you need to know its frequency. Then multiply the frequency by Planck’s constant.
Here we have only the wavelength, but we can get the frequency from the relation: v = fλ.
since it is an electromagnetic wave, it’s speed is 3.0 x 10⁻⁸ ms-1. and hence f=v/λ. that is:
=4.6154 x 10¹⁵ HZ
The energy of a wave was defined as E = hf where h (plank’s constant)= 6.63×10⁻³⁴ Js
hence E = 6.63 x 10-34 Js x 4.6154 x 1015 HZ≈ 3.06 x 10⁻²⁰J.
Wave is a form of energy. Wave energy is useful as well as dangerous to human beings. Communication technology uses concept of waves as its fundamentals. Earth quakes are as a result of seismic waves resulting from shifting of locks within the earth.
Phenomenon’s like formation of rainbows formation, mirages and thin films in oil shows presence of waves. Variations in quality of sound from musical instruments is based on the properties of waves.
Wave properties can be investigated by use of a ripple tank. Waves exhibits various properties that can be conveniently illustrated using a ripple tank.
The ripple tank
Ripple tank helps us study properties of water waves. Studying water waves can help us explain the characteristics of other types of waves such as light and sound waves.
Ripple tank consists of:
a transparent tray containing water
a point source of light above the tray
white paper screen and
an electric motor.
The white screen is underneath the tray while the electric motor is on the surface of the water in the tray. The figure below shows the basic structure of the ripple tank.
The water waves are the ripples traveling across the surface of the shallow water in the tray . This ripples are produced by the vibrations of the electric motor.
When you deep a finger in water, a pulse of wave is usually produced. This circular wave radiates outwards from the source of disturbance. This pulse in water is called a ripple. water ripples are progressive as they continuously propagate away from the source.
How ripple tank is used
A generator enables generation of continuous ripples. The electric motor is mounted on a wooden bar on a ripple tank. When the motor is started, the bar is made to vibrate by an electric metal disc on the axle of the motor.
To generate continuous straight waves, the length of the bar is adjusted so that it just touches the water surface. To generate continuous circular waves , a small ball called a dipper fitted to the bar is adjusted so that it just touches the water surface.see the figure below:
The figure below shows circular and line waves:
When the light from the lamp passes through the waves , the images of the waves are projected on the paper underneath.
Since the bottom of the tray is transparent, the light casts an image of the passing waves on the screen. When light from the lamp is passing through the water, the curve of the water surface acts like a series of lenses. These lenses are both converging and diverging that focus light to create a series of bright and dull lines. The wave crests produce bright lines while troughs produce dark lines. see the figure below.
To cut down unwanted reflections, the sides of the tray is aligned with spongy material.
For easier observations of the progressive waves, a stroboscope is used.
Stroboscope
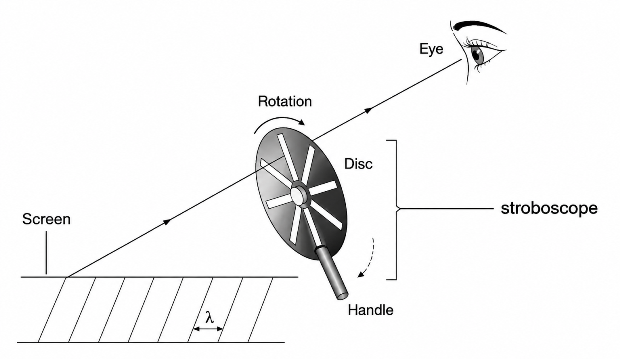
A stroboscope is a disc with equally spaced slits which can be rotated by hand or a motor. If the speed of rotation is such that the wavefront advances one wavelength each time a slit passes through the eye, the wave fonts appears to be stationary. The waves are then said to be frozen.
Another type of stroboscope is made up of a lamp which flashes light on and off at a controllable measurable rate. At a frozen motion, the successive appearance of the slits at a particular point matches exactly with the period of the wave. this gives persistence of vision as the eye receives glimpses of the waves at the same level of displacement each time. The figure below illustrates observation of water waves through a stroboscope.
The wave pattern is represented by wavefronts lines that connects all the points that are in phase as the wave progresses. It follows that the distance between successive wave-fronts is equal to one wavelength.
Vocabulary of waves
oscillation
Also known as vibration. oscillation is when a wave makes one complete cycle of to and fro motion about the mean position.
the figure below illustrates a wave making one oscillation:
Amplitude
It is the maximum displacement of a particle from its rest position.
wavelength
This is the distance between two successive particles which are in phase and are moving to the same direction.
Frequency f
This is the number pf oscillations made by the wave in one second.
The term “properties of cathode rays” refers to the various physical characteristics and behaviors observed when cathode rays are studied under different conditions.
properties of cathode rays includes:
They travel in a straight line
They cause fluoresce or glow to certain materials
they are charged
They possesses kinetic energy
pass through thin materials, demonstrating their ability to penetrate objects to varying degrees depending on the material’s density and the energy of the rays.
ionize gases
The charge-to-mass ratio of cathode rays (electrons) is relatively high. A property used to identify the electron and distinguish it from other particles.
Deflection by Magnetic Fields
Showing that cathode rays travels in a straight line
When an opaque object is placed between the screen and the cathode in the path of the cathode rays, a sharp shadow is cast on the screen.
Cathode rays causes certain substances to glow or fluoresce
Fluoresce materials are materials that glows when electromagnetic energies falls on them. such materials includes zinc sulphide, Fluorescein, Rhodamine, Coumarin, Acridine Orange and Quantum Dots.
when cathode rays falls on screen coated with the fluoresce materials, the fluoresce material glows.
showing that cathode rays are charged
Cathode rays are deflected by both magnetic and electric fields.
Inside the magnetic field, the cathode rays are deflected towards the positive plate showing that they are negatively charged. Remember that opposite charges attract while while same charges repel from the basic law of charges. see the figure below:
When cathode rays passes through magnetic field, they are deflected in the direction determined by Fleming’s left-hand rule. The deflection in magnetic field shows that they are negatively charged as shown in figure below.
Cathode rays have kinetic energy
The deflection of cathode rays in a magnetic field shows they are moving, and therefore possess kinetic energy. By measuring how much the cathode rays bend in the magnetic field, you can calculate their velocity. Using the velocity, you can compute the kinetic energy of the cathode rays.
When cathode rays are suddenly stopped by a metal target, they can produce x-rays. This confirms that they are actually a stream of fast moving electrons.
Exam Questions on properties of cathode rays
Figure 14 shows a cathode ray tube. A metal plate is placed between the anode and the screen.
(I) State with reason what would be observed on the screen when the cathode rays are produced. (2 marks)
(ii) State the effects on the cathode rays produced when the anode is increased. ( 2 marks)
An alternating current generator is also known as an alternator. A generator is a device or machine that converts mechanical energy energy into electrical energy by rotating conductors through magnetic fields.
Figure below illustrates a simple generator made of curved permanent rectangular magnetic poles, slip rings, conductor made into a loop and carbon brushes.
The poles of magnets are curved so that the magnetic field is radial. Current enters and leaves the coil through the brushes which are pressing against the slip rings.
Carbon brushes are preferred because they are good conductor, slippery to allow the wire slide along with ease and acts as a lubricant.
The a.c Generator
The ac generator will produce electric current in the coil when the coil rotates through magnetic field using the principle of electromagnetic induction.
When the coil rotates clockwise as indicated on the diagram at the rotation axis, edge AB rotates upwards while CD rotates downwards causing the two edges cuts the magnetic field at right angles while at the horizontal position. The induced e.m.f is maximum when the coil is perpendicular the the magnetic field.
Using the Fleming’s right-hand rule, the flow of current is in direction A-B-C-D when the direction of rotation is clockwise. The induced current flows through the external circuit via the slip rings and through carbon brushes.
As the coil rotates from horizontal to vertical position, the angle at which the sides of the coil cuts the magnetic field reduces from 90o to 0o causing the induced e.m.f reduces from maximum value (Eo) to zero e.m.f. when the coil becomes positioned vertically
An overview of the cross-section of the coil in a magnetic field is shown below.
At the instant when the coil is rotating past the vertical position, the sides AB and CD is moving parallel to the field and that position the coil do not cut the magnet field and therefore the induced e.m.f is zero at that position.
Past the vertical position, side AB and CD exchanges position .Side AB starts moving downward and CD upward. The angle at which the sides of the coil cuts the magnetic field increases from 0o to 90o when the coil comes back to horizontal position.
When the angle is increasing from zero to 90o , the induced e.m.f increases from zero to maximum value Eo. When AB and CD exchanges positions in the coil rotation, the direction of current flow reverses to D-C-B-A making brush y positive and brush x negative.
As the coil rotates further to complete one revolution, the angle at which its sides cuts the magnetic field reduces from 90o to 0o and the e.m.f induced in the coil reduces from maximum value Eo to zero.
Variation of current in an a.c generator
The variation of the e.m.f increases from zero to maximum at one quarter cycle before reducing from maximum to zero at the next quarter circle and then starts increasing to maximum value in the negative direction in the third cycle. At the fourth cycle, it increases from maximum negative value to zero. Thus, in one complete oscillation of the coil, the variation of induced e.m.f against the angle of rotation forms a sinusoidal curve. The curve formed by this variation can be represented by the equation:
E = Eo sin θ
where E is an instantaneous e.m.f at any particular angle of rotation where Eo is the maximum e.m.f and θ the angle between plane of the coil and the vertical axis.
The formation of the sine curve is as illustrated
By ohms law, I = E/R where R is the resistance of the circuit and I is an instantaneous current at random position of ration of the coil.
Therefore I = (Eo/R) sin θ
A typical graph of e.m.f against the angle θ is as illustrated
After one complete circle, the rotation pattern repeats itself and many circles are made per unit time. The number of cycles made per second is referred as the frequency of the generator and is also the frequency of the a.c current.
Most of generators used to make commercial power productions makes 50-60 revolutions per second. In USA, the frequency is 60Hz while in Europe and Asia, it is usually 50 Hz.
Magnetic field is a region around the magnet where the magnetic force is experienced.
Magnetic field is represented by lines called magnetic field lines which also show direction of the magnetic field.
Direction of magnetic force is the direction to which a north pole of a magnet would move when set to freely move.
Properties of magnetic field lines
Magnetic field lines must not cross each other but always flows parallel to each other. They repel each other and forms closed paths.
At the middle of a bar magnet, which is the midpoint of the separation of the two poles of a magnet, there exists no magnet field as there is no magnetic field lines passing there. Such a point is usually referred to as the neutral line.
A neutral point in a magnetic field is the point where the magnetism due to like poles cancels each other.
The poles of a magnetic have the highest concentration of the magnetic field lines hence the strongest magnetic force.
The stronger the magnet, the closer the field lines.
If the magnetic field lines are parallel and equally spaced , then the magnetic field is said to be uniform.
The direction of magnetic field lines is such a way that they run from north towards the south outside of the magnet and from south to north inside the magnet as shown.
They are equations that shows the relationship between ratio of turns in secondary to primary coil and the ration of their voltages and consequently the current.
The first equation states that:
similarly, for an ideal transformer where no energy loss is experienced, the power in primary coil = power in secondary coil
Electrical power P is given by ; P = Current I x Voltage V
Let Ip =current in primary coil and Is = current in secondary coil
Then we have :
primary current x primary voltage = secondary current x secondary voltage
To verify Hooke’s Law, you can conduct a simple experiment using a spring and weights and follow the steps below.
Apparatus
A spring (helical coil spring)
A support stand or clamp
A ruler or measuring tape
Weights (e.g., metal washers or masses)
A balance or scale (optional, for measuring weights)
Procedure:
set the apparatus as shown
One end of the spring is securely fixed to a support stand or clamp, ensuring that the spring hangs vertically without touching any surfaces.
The length of the spring is determined by reading the pointer position on the ruler fixed besides the spring as in the figure below. This will serve as the reference length 𝐿0=_______________
We Start by attaching a small weight of like 50g (0.5N) to the free end of the spring as shown.
We record the weight of the added mass 𝑚 in kg. The weight should be small enough to avoid damaging the spring but large enough to cause noticeable stretching.
With the weight attached, we measure and record the new length of the spring and then subtract the initial length 𝐿0 from the stretched length L to find the extension e
Record the extension found from e=L-𝐿0
We increase the load and record the corresponding extension in each case so as there is a table showing extensions given by different forces on the spring. The table is similar to the one shown below.
A graph of force F against the extension per each force resulting to a straight line through the origin as shown below:
Notes:
Ensure that the spring is not stretched beyond its elastic limit, as this can cause permanent deformation and invalidate the results.
Repeat the experiment multiple times to ensure accuracy and reliability of the measurements.
Use a balance or scale to measure weights accurately, and be cautious when handling heavy objects to prevent accidents.
Observations
Provided the stretching weight is not too much, the spring always return to it’s original length when weight is unloaded.A plot of stretching force against extension is a straight line through the origin showing that the ratio of force against extension is a constant.
Explanations
Extension of a spring is directly proportional to the stretching force F. The stretching force can be exceeded beyond a certain value that causes permanent stretching that does allow return of original length on unloading.
The graph of extension against stretching force is as shown.
OP represents the permanent stretching or permanent extension of the spring.
Point E is known as the elastic limit of the spring. Beyond the elastic limit , further extension causes permanent extension.
Hooke’s law
This is a law that was developed by Robert Hooke after he investigated principles behind stretching of materials under forces and concluded his findings in Hooke’s law that states that:
For a helical spring or other elastic material, the extension is directly proportional to the stretching force provided the elastic limit is not exceeded.
The Hooke’s law cab be represented with mathematical notations as:
Force F ∝ extension e;
From the relationship above, an equation is developed such that:
F = ke where k is a constant of proportionality which depends on the material making the spring. The constant k is usually referred to as the spring constant.
k is obtained from the plotting of F against e as the gradient of the graph as shown below
That is;
gradient = k = change in force/ change in extension
The spring constant is expressed in Nm-1 as it’s SI units.
Remember that some work is done whenever a force moves some distance s. that is; work = Fs.
Therefore, work is done by force when spring extends by distance e. The total work done by the masses stretching the spring is the average the work done by individual mass and can be obtained as area under the graph of force F against extension e.
The area under the graph is definitely the area of a triangle which will be obtained as work done = (1/2)Fe where F is the force applied and e is the extension produced by the force.
but F = ke and so we can substitute F for ke so that we have :
Questions for practice
A mass of 100g is suspended from the lower end of a spring . If the spring extends by 100 mm and the elastic limit of the spring is not exceeded, what is the spring constant.
Answer: 10 Nm-1
2. A metal cube suspended freely from the end of a spring causes it to stretch by 5.0 cm. A 500 g mass suspended from the same spring stretches it by 2.0 cm. If the elastic limit is not exceeded:
(a) Find the weight of the metal cube (answer: 12.5 N)
(b) By what length with the spring stretch if a mass of 1.5 kg is attached to it’s end? (answer: 6.0 cm)
Cookie Consent
We use cookies to improve your experience on our site. By using our site, you consent to cookies.
Contains information related to marketing campaigns of the user. These are shared with Google AdWords / Google Ads when the Google Ads and Google Analytics accounts are linked together.
90 days
__utma
ID used to identify users and sessions
2 years after last activity
__utmt
Used to monitor number of Google Analytics server requests
10 minutes
__utmb
Used to distinguish new sessions and visits. This cookie is set when the GA.js javascript library is loaded and there is no existing __utmb cookie. The cookie is updated every time data is sent to the Google Analytics server.
30 minutes after last activity
__utmc
Used only with old Urchin versions of Google Analytics and not with GA.js. Was used to distinguish between new sessions and visits at the end of a session.
End of session (browser)
__utmz
Contains information about the traffic source or campaign that directed user to the website. The cookie is set when the GA.js javascript is loaded and updated when data is sent to the Google Anaytics server
6 months after last activity
__utmv
Contains custom information set by the web developer via the _setCustomVar method in Google Analytics. This cookie is updated every time new data is sent to the Google Analytics server.
2 years after last activity
__utmx
Used to determine whether a user is included in an A / B or Multivariate test.
18 months
_ga
ID used to identify users
2 years
_gali
Used by Google Analytics to determine which links on a page are being clicked
30 seconds
_ga_
ID used to identify users
2 years
_gid
ID used to identify users for 24 hours after last activity
24 hours
_gat
Used to monitor number of Google Analytics server requests when using Google Tag Manager