Category: Physics

  • Rotation in Geometry: A Complete Guide for  Learners

    Rotation in Geometry: A Complete Guide for Learners

    Introduction

    Rotation is one of the most important transformations in Geometry. It is used in Mathematics, Engineering, Architecture, Computer Graphics, Robotics, Astronomy, and many other scientific fields.

    Whenever an object turns about a fixed point, the transformation is called a rotation.

    Examples of rotation in everyday life include:

    • Opening and closing a door
    • The hands of a clock
    • A ceiling fan
    • A bicycle wheel
    • A spinning top
    • A propeller
    • A merry-go-round

    In each case, the object turns about a fixed point known as the centre of rotation.


    What is Rotation?

    Rotation is a transformation that turns an object about a fixed point called the centre of rotation through a specified angle and direction.

    Unlike enlargement, rotation does not change the size of an object.

    The shape, size and distances between corresponding points remain unchanged.

    Rotation is therefore classified as an isometry.

    Key Terms

    TermMeaning
    Centre of RotationFixed point about which an object turns
    Angle of RotationAmount of turning measured in degrees
    Direction of RotationClockwise or Anticlockwise
    ImageNew position of the object after rotation
    ObjectOriginal figure before rotation

    Measuring Rotation

    The angle of rotation is measured in degrees.

    Common Rotations

    RotationAngle
    Quarter Turn90°
    Half Turn180°
    Three-Quarter Turn270°
    Full Revolution360°

    Illustration

    Observe how the arrow changes direction after each turn.

    • Quarter Turn = 90°
    • Half Turn = 180°
    • Three Quarter Turn = 270°
    • Full Revolution = 360°

    Direction of Rotation

    There are two possible directions of rotation.

    1. Clockwise Rotation

    A rotation in the same direction as the hands of a clock.

    2. Anticlockwise Rotation

    A rotation opposite to the direction of the hands of a clock.

    the figure below illustrates rotation of clockwise and anticlockwise rotation of 90o about the origin

    clockwise and anticlockwise rotation illustrated

    Sign Convention

    Mathematicians use signs to indicate the direction.

    DirectionSign
    AnticlockwisePositive (+)
    ClockwiseNegative (-)

    Examples:

    • +90° means 90° anticlockwise
    • -90° means 90° clockwise
    • +180° means 180° anticlockwise
    • -150° means 150° clockwise

    Rotation Through 90°

    A rotation through 90° is called a quarter turn.

    Construction Procedure

    Suppose triangle ABC in the figure below is rotated through +90° about point P.

    1. Join P to A.
    2. Measure PA.
    3. Draw a 90° angle from PA.
    4. Mark point A’ such that:

    PA = PA’

    1. Repeat for points B and C.
    2. Join A’, B’ and C’.

    The figure A’B’C’ is the image of triangle ABC.

    Important Observation

    When a figure is rotated:

    • A’B’ = AB
    • B’C’ = BC
    • A’C’ = AC

    Therefore:

    Rotation preserves size and shape.

    Illustration

    showing rotation of ABC to an image A'B'C'

    Rotation Through 180°

    A rotation through 180° is called a half turn.

    Construction Procedure

    Suppose triangle PQR is rotated through 180° about point O.

    1. Join P to O.
    2. Extend line PO.
    3. Mark P’ such that:

    PO = OP’

    1. Repeat for Q and R.
    2. Join P’, Q’ and R’.

    The resulting triangle is the image of triangle PQR.

    Observation

    For a 180° rotation:

    • Corresponding sides remain equal.
    • Corresponding sides become parallel.

    Therefore:

    $$\frac{PQ}{P’Q’} = \frac{QR}{Q’R’} = \frac{PR}{P’R’} =1$$

    Hence:

    Object Size = Image Size

    Illustration


    Rotation Through 360°

    A rotation through 360° is called a full revolution.

    When an object is rotated through 360° about any point:

    The image coincides exactly with the original object.

    In other words:

    A figure rotated through 360° maps onto itself.

    Rotation Angle: 0°
    Rotate the figure through 360° and observe what happens.

    Properties of Rotation

    Rotation has several important properties.

    Property 1: Rotation is an Isometry

    The size of the figure remains unchanged.

    Property 2: Lengths are Preserved

    Corresponding sides remain equal.

    Property 3: Angles are Preserved

    Corresponding angles remain equal.

    Property 4: Shape is Preserved

    No distortion occurs.

    Property 5: Orientation Changes

    The position of the object changes although its size remains unchanged.


    Worked Example 1

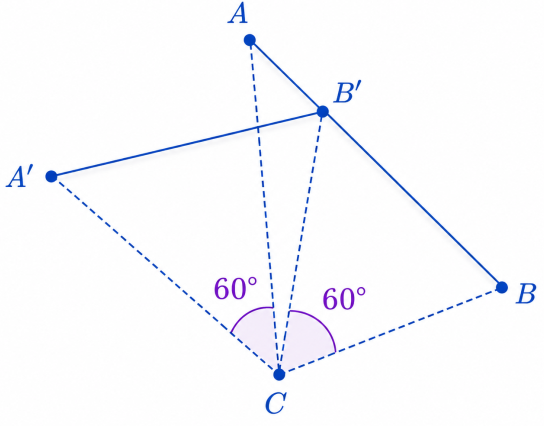
    Rotating a Line Through 60°

    Line AB is rotated through 60° about point C.

    Find the image A’B’ under this rotation

    Solution

    1. Join B to C.
    2. Measure CB.
    3. Construct angle BCB’ = 60°.
    4. Mark B’ such that:

    BC = BC’

    1. Repeat the procedure for point A.
    2. Join A’ to B’.

    The resulting line A’B’ is the image of line AB.

    Illustration

    rotating a line through an angle of 60 degrees

    Worked Example 2

    Rotating Triangle PQR Through -150°

    The triangle PQR is rotated through -150° about point O.

    Solution

    1. Join P to O.
    2. Construct angle POP’ = 150° clockwise.
    3. Mark P’ such that:

    OP = OP’

    1. Repeat for Q and R.
    2. Join P’, Q’ and R’.

    The resulting triangle is the required image.

    Illustration


    Finding the Centre of Rotation

    Sometimes both the object and its image are given.

    The task is to determine the centre of rotation.

    Example:

    Triangle ABC is mapped onto a triangle A’B’C’ under a certain rotation.

    Procedure

    Step 1

    Join a point and its corresponding image.

    For example:

    C to C’

    Step 2

    Construct the perpendicular bisector.

    Step 3

    Repeat using another pair of corresponding points.

    For example:

    B to B’

    Step 4

    The intersection of the two perpendicular bisectors is the centre of rotation.

    Illustration


    Finding the Angle of Rotation

    Once the centre of rotation has been found:

    1. Join the centre to a point on the object.
    2. Join the centre to the corresponding point on the image.
    3. Measure the angle between the two lines.

    This angle is the angle of rotation.

    observations

    For triangle ABC and image A’B’C’:

    ∠COC’ = 110°

    Therefore:

    • Angle of rotation = -110°
    • Equivalent positive angle = 250°

    Both answers describe the same rotation.


    Example: Finding the Centre and Angle of Rotation of WX

    Suppose line segment WX is mapped onto W’X’.

    Solution
    1. Join W to W’.
    2. Join X to X’.
    3. Construct perpendicular bisectors.
    4. The bisectors meet at O.

    Therefore:

    O is the centre of rotation.

    Measure:

    ∠WOW’ = 60°

    Hence:

    Angle of rotation = 60°

    or

    Angle of rotation = -300°

    Illustration


    Rotation Rules in Coordinate Geometry

    For rotations about the origin:

    90° Anticlockwise rotation

    (x, y) → (-y, x)

    Example:

    (3, 2) → (-2, 3)


    180° Rotation

    (x, y) → (-x, -y)

    Example:

    (3, 2) → (-3, -2)


    270° Anticlockwise Rotation

    (x, y) → (y, -x)

    Example:

    (3, 2) → (2, -3)


    360° Rotation

    (x, y) → (x, y)

    The point remains unchanged.


    Interactive Activity

    Try the rotation simulator below.

    Students should:

    • Rotate shapes through 90°, 180°, 270° and 360°.
    • Observe how distances remain constant.
    • Compare clockwise and anticlockwise rotations.
    • Investigate how changing the centre of rotation affects the image.
    Rotation Simulator

    Rotation Simulator

    Explore rotations of a shape about a centre. Observe that distances from the centre remain constant.

    Click anywhere on the canvas to change the centre of rotation.


    Practice Questions

    Question 1

    A triangle is rotated through +90° about point O. What type of turn has occurred?

    Question 2

    Describe the image of a figure after a 180° rotation.

    Question 3

    A point (4, 2) is rotated 90° anticlockwise about the origin. Find its image.

    Question 4

    A figure is rotated through 360°. Describe the image.

    Question 5

    Explain how the centre of rotation can be determined when both the object and image are given.


    Summary

    Rotation is a transformation that turns a figure about a fixed point called the centre of rotation.

    Key facts:

    ✓ Rotation preserves size and shape.

    ✓ Rotation is an isometry.

    ✓ Positive angles indicate anticlockwise rotation.

    ✓ Negative angles indicate clockwise rotation.

    ✓ Common angles are 90°, 180°, 270° and 360°.

    ✓ The centre of rotation can be found using perpendicular bisectors.

    ✓ The angle of rotation can be measured from corresponding points and the centre of rotation.

    Understanding rotation provides a foundation for advanced studies in coordinate geometry, trigonometry, matrices, computer graphics and engineering.

    Related topics

  • Factors Affecting Magnitude of an Induced EMF

    Factors Affecting Magnitude of an Induced EMF

    Electromagnetic induction is a fundamental concept in physics that explains how electricity can be generated from a changing magnetic field. Whenever the magnetic flux linking a conductor changes, an electromotive force (EMF) is induced in the conductor. However, the magnitude of the induced EMF is not always the same; it depends on several factors that influence the rate at which the magnetic flux changes. Understanding these factors is essential for explaining the operation of electrical devices such as generators, transformers, and induction coils. In this article, we will explore the key factors that affect the magnitude of an induced EMF and examine how each factor contributes to the efficiency of electromagnetic induction.

    The amount of current produced from changing magnetic flux depends on a number of factors which includes:

    • Rate of change of magnetic flux
    • strength of magnetic field
    • number of turns in a coil
    i. Rate of change of magnetic flux

    The faster the rate of change of magnetic field, the higher the magnitude of the induced current.

    Consider a coil of about 200 turns of a wire, sensitive galvanometer and a magnet arranged as shown in figure below.

    To investigate how rate of change of magnetic flux, you move the magnet towards the coil and away at various speeds such as very fast, moderately fast and slowly.

    You observe that the faster the magnet is moved to and from the coil, the higher the deflection on the galvanometer. This shows that induced EMF is highest when the rate of change of magnetic flux is highest.

    Magnetic flux could be interpreted as the number of magnetic field touching the coil at any given moment.

    Magnetic flux Φ is the strength of magnetic field threading a given area.

    The magnetic flux Φ changes when the magnet is withdrawn from the coil where a faster withdrawal gives rise to a higher rate of change in magnetic flux linking the coil which then gives an increased induced Electromotive force(e.m.f)

    see the diagram below that shows magnetic field lines:

    ii. strength of magnetic field

    Moving a stronger magnetic towards or away from the coil causes increase of the induced current when the speed of movement remains constant.

    Consider a u-shaped electromagnet and a variable resistor connected to a circuit shown such that an electromagnet can have it’s strength varied by changing current passing through using the variable resistor.

    factors affecting magnitude of induced emf

    After the setup, you can do the following to investigate the current induced with strength of the magnet:

    • Adjust the variable resistor so that minimum current flows.
    • Move the conductor PQ in a direction perpendicular to the magnetic field of the electromagnet and note deflection on the galvanometer.
    • change values of current and record corresponding readings on the galvanometer when wire cuts across the magnetic field.

    Whenever current through the ammeter is increased, a greater deflection is obtained on the galvanometer when the conductor wire cuts across the magnetic field.

    Higher current passing through a coil of wire leads to a stronger electromagnet that will produce stronger magnetic field .

    We can therefore conclude that the magnitude of the induced current is directly proportional to the strength of the magnetic field from which it is being produced.

    iii. number of turns in a coil

    If all other factors are held constant but the number of turns of wire on the coil increased, the induced current is observed to increase proportionately to increased number of turns.

    Having at your disposal insulated copper wire, sensitive galvanometer, magnet and connecting cables, you make a coil of numbered turns of wire and set up the apparatus as shown

    to investigate how number of turns in a coil affects magnitude of the induced emf, do the following:

    • Insert a magnet in the coil and then withdraw it at a steady speed and then observe and record the maximum reading on the galvanometer.
    • Increase number of turns on the coil at equal intervals says 50, 100,150,200,250 etc and repeat the above procedure noting the maximum deflection each time.

    Each time the number of turns of the coil is increased and all other factors held constant, a higher deflection on the galvanometer is recorded. The deflection is proportional to the number of turns used.

    Increased deflection indicates more current is produced in the coil. The induced emf is proportional to the number of turns and so we can say that each turn on the coil induces it’s own e.m.f. The total induced e.m.f is therefore a summation of all emfs produced by individual turns.

    Infact by application of calculus, we can be able to express summation mathematically, but we will do that later in more advanced lessons.

    Conclusions

    Experiments shows that an e.m.f is induced in a circuit whenever magnetic flux linkage changes and the magnitude of the induced e.m.f increases with increase in the rate of change of the flux linkage and the number of turns of the coil.

    The observations from experiments can be summarized in a Faraday’s law of electromagnetic induction which states that:

    Revision exercise

    Factors Affecting Magnitude of an Induced EMF

    Related topics


    References

    • Secondary Physics Student’s Book Four. 3rd ed., Kenya Literature Bureau, 2012.
    • Tom D., and Heather K. Cambridge IGCSE Physics. 3rd ed., Hodder Education, 2018, https://doi.org/978 1 4441 76421.
  • Electromotive Force (E.M.F) and Potential Difference (P.D)

    Electromotive Force (E.M.F) and Potential Difference (P.D)

    Electricity powers our homes, devices, and industries, yet many students find electrical concepts difficult to understand. Two of the most important ideas in electricity are Electromotive Force (E.M.F) and Potential Difference (P.D). These concepts explain how electrical energy is supplied and how electric current flows in a circuit.

    One of the easiest ways to understand E.M.F and P.D is by comparing an electric circuit to the flow of water through pipes. Just as a pump pushes water through a system, a battery pushes electric charges through a circuit. This simple analogy helps explain how voltage is produced, why current flows, and why some energy is lost inside a battery.

    In this article, you will learn:

    • What Electromotive Force (E.M.F) means
    • The meaning of Potential Difference (P.D)
    • The difference between E.M.F and P.D
    • How batteries supply electrical energy
    • The role of internal resistance and lost volts
    • Real-life examples of voltage in electric circuits

    By the end of this guide, you will have a clear understanding of how electrical energy moves through a circuit and why voltage behaves differently in open and closed circuit


    What is Potential Difference?

    Potential difference is the work done in moving a unit charge from one point to another in a circuit. It is commonly called voltage and is measured in volts (V).

    A simple way to understand potential difference is by comparing it to water flowing between two containers.

    Water Flow Analogy

    Imagine two containers connected by a pipe:

    • If one container has a higher water level than the other, water flows from the higher level to the lower level.
    • The greater the difference in water levels, the faster the flow.
    • When the water levels become equal, the flow stops.

    see the figure below:

    water flow between two containers to illustrate Electromotive Force (E.M.F) and Potential Difference (P.D)
    Water Flow Analogy Animation

    (a) Water flows to lower level

    A
    B

    This difference in water levels is similar to potential difference in electricity. Charges only flow when there is a difference in electrical potential between two points.


    Potential Energy in Water Flow

    Water at a higher position possesses gravitational potential energy.

    If water is raised to a height h1h_1​, it can flow down to a lower level h0h_0​. The larger the height difference, the greater the energy available to move the water.

    Similarly, electric charges move from a point of higher electrical potential to a point of lower electrical potential.

    The figure below shows water falling under gravitational force:

    A useful way to understand electric potential difference is by comparing it to the flow of water in a closed circuit. Water raised to a higher level possesses gravitational potential energy. The higher the water is raised, the greater its potential energy and the faster it can flow to a lower level. A pump is needed to lift the water back to the higher level and maintain continuous flow. In the same way, a battery supplies energy to electric charges, creating a potential difference that causes them to move through a circuit from a region of higher potential to a region of lower potential.

    Let us study the flow of water in figure below, which can be referred to as a water circuit because water flows round a complete ring.

    Water Flow with Rotating Pump
    Pump
    h₁
    h₀
    Potential
    Difference

    Water at a height h₁ from the ground level has potential energy because of its position. The greater the height, the higher the potential energy. The rate of flow will depend on the height at which the water had initially been raised. A higher water level results in a faster rate of flow.

    The potential energy can be calculated as:

    Potential energy = mgh, where m is the mass of water falling and g the gravitational pull on water.

    At a height h₀, the water has no potential energy.

    If the water is to be raised to h₁, a pump has to be used. So long as the pump in the water circuit is working, the water will move round the complete path, from a point of higher potential energy to a point of lower potential energy.

    The pump creates a difference in potential.


    The Role of a Pump and a Battery in e.m.f

    In a water circuit, a pump raises water to a higher level so that it continues flowing around the system. In an electric circuit, the battery performs a similar role:

    • The battery pumps charges to a higher electrical potential.
    • These charges then move through the conductor and electrical devices such as bulbs or lamps.
    • The movement of charges forms an electric current.

    The battery therefore creates the potential difference needed for current to flow.

    consider the setup below:

    Battery Pumping Charges
    + + + + + + + + + Battery Copper wire External device Potential difference 0 V 12 V

    For the charges to move through the conductor, there must be a battery which produces an electrical potential difference at the ends of the conductor. The battery does the work of pumping charges to a high potential so that they can flow. The higher the potential difference (p.d.), the stronger the current in the circuit, if other factors like opposition to flow of current (resistance) are kept constant. The model of the circuit shown in the figure above can help suggest that the function of a battery is to cause a potential difference across a conductor.

    Not all the energy supplied by the pump is used to drive the water round the circuit. Some of the energy is lost in moving or raising parts of the pump. Similarly, for the battery, some energy is lost in moving charges through the battery itself. The total energy supplied by the battery is called its electromotive force (e.m.f.).

    Potential difference is measured in volts, by an instrument called voltmeter.

    Although both e.m.f. and p.d. are measured in volts, the potential difference of a cell is different from its e.m.f. The e.m.f. of a cell is the voltage across its terminals when it is supplying no current in the circuit (an open circuit), while the p.d. of a cell is the voltage across the cell in a closed circuit. in the Figure below: (a) and (b) shows the e.m.f. of the cell as 1.5 V and the p.d. as 1.45 V respectively.

    electromotive force (e.m.f) and potential difference(p.d)

    illustrating e.m.f and p.d in a battery

    Interactive Circuit Animation

    Close the switch to complete the circuit

    Switch + V₁ 1.50 V
    Circuit OPEN

    Open circuit

    • No current flows
    • Bulb is OFF
    • Voltmeter reads the emf

    V₁ = 1.50 V

    Closed circuit

    • Current flows
    • Bulb shines brightly
    • Voltage drops slightly

    V₂ = 1.45 V

    When the switch is open No current flows in the circuit (a), therefore the voltmeter reads the full e.m.f of the cell.

    When the switch is closed Current flows through the circuit. Some energy is lost inside the cell because of internal resistance. The terminal voltage becomes slightly lower.That is, 1.45V.

    The difference between the readings is known as the lost volts, in this case 0.05 V. This voltage is lost because of the opposition to the flow of charges within the cell (internal resistance).”


    Electromotive Force (E.M.F)

    The total energy supplied by a battery to move charges around a complete circuit is called the electromotive force (e.m.f).

    Although both e.m.f and potential difference are measured in volts, they are not exactly the same.

    by definition; E.m.f is the voltage across the terminals of a cell when the circuit is open, and no current is flowing.


    Difference Between E.M.F and Potential Difference

    Electromotive Force (E.M.F)Potential Difference (P.D)
    Energy supplied by the cellEnergy used between two points
    Measured when no current flowsMeasured when current flows
    Occurs in an open circuitOccurs in a closed circuit
    Represents total supplied energyRepresents useful energy delivered


    e.m.f and the Lost Volts

    The difference between the e.m.f and the terminal potential difference is known as the lost volts.

    Example:Lost volts=1.50V1.45V=0.05V\text{Lost volts} = 1.50V - 1.45V = 0.05V

    This loss in voltage occurs because of the opposition to the flow of charges within the cell. This resistance is referred to as the internal resistance.


    Key Points to Remember

    • Charges flow only when there is a potential difference.
    • A battery creates the potential difference in a circuit.
    • E.m.f is the total energy supplied by a cell.
    • Potential difference is the energy used between two points in a circuit.
    • Internal resistance causes some voltage to be lost inside the cell.

    Conclusion

    The concepts of e.m.f and potential difference are fundamental in electricity. Using the water-flow analogy helps simplify these ideas:

    • Water level difference corresponds to electrical potential difference.
    • A pump corresponds to a battery.
    • Water flow corresponds to electric current.

    Understanding these concepts provides a strong foundation for studying electric circuits and electrical energy transfer.

    Revision exercise


    Prepared for physics learners and teachers as a simple guide to understanding electromotive force and potential difference.

    Related topics

  • Electromotive Force and Internal Resistance

    Electromotive Force and Internal Resistance

    The function of a cell in a circuit is to supply electrical energy. By definition, the electromotive force (e.m.f.) of a cell is the potential difference between its terminals when no charge is flowing out of the cell (cell in open circuit).

    Electric cells and batteries are essential sources of electrical energy in everyday life. From powering flashlights and radios to running vehicles and electronic devices, cells convert chemical energy into electrical energy. However, no cell is perfect. Every cell possesses a small internal resistance that affects the voltage supplied to an external circuit.

    Figure below shows a circuit that may be used to demonstrate the difference between e.m.f. of a cell and terminal voltage.

    diagram to investigate Electromotive Force and Internal Resistance
    illustrating reading of an e.m.f

    The reading of the voltmeter when the switch is open is the e.m.f. of the cell.

    Once a cell supplies current to an external circuit, the potential difference across it drops by a value referred to as ‘lost voltage’. This loss in voltage is due to the internal resistance of the cell.

    The potential difference across the cell when the circuit is closed is referred to as the terminal voltage of the cell.


    Relationship Between electromotive force and Internal Resistance

    If a resistor RR is connected in series with a cell as shown in figure below, the internal resistance of the cell rr, is considered to be connected in series with the external resistor RR.

    graph to illustrate Electromotive Force and Internal Resistance
    illustrating internal resistance of a cell

    The current flowing in the circuit is therefore given by the equation;

    I=ER+rI = \frac{E}{R+r}

    where EE is the e.m.f. of the cell.

    Thus,

    E=I(R+r)E = I(R+r)

    E=IR+IrE = IR + Ir

    =V+Ir

    IRIR is the voltage drop across the external resistor RRR while Ir is the voltage drop across the internal resistance.

    The voltage across the external resistor is called the terminal voltage while the p.d. drop across the internal resistance is called the lost voltage.

    Battery Internal Resistance Animation

    Battery Internal Resistance Animation

    Explanation of the Animation:

    • The blue moving dots represent electric current flowing through the circuit.
    • Inside the battery, the battery emf (E) pushes charges through the internal resistance r.
    • The orange glowing effect inside the resistor r shows that some electrical energy is lost as heat inside the battery.
    • The external resistor R receives the remaining energy from the battery.
    • Increasing internal resistance causes greater voltage loss inside the battery.

    Experiment to determine the internal resistance and electromotive force of a cell
    Method 1

    Apparatus

    Voltmeter, ammeter, rheostat, cells, connecting wires.

    Procedure
    • Connect the apparatus as shown in figure below
    Determining internal resistance of a cell
    • Switch on the circuit and set the current to the minimum value possible.
    • Increase the current in steps and record the corresponding terminal voltage VV in table below.

    Table of current against voltage

    current I(A)
    Voltage (V)
    • Plot a graph of voltage against current.
    Internal Resistance Simulation

    Determining Internal Resistance of a Cell

    set current with the slider

    Control Current Using Rheostat

    Ammeter

    0.0 A

    Voltmeter

    1.50 V
    Current I (A) Voltage V (V)

    Results and Conclusion

    The graph of voltage against current is as shown below.

    Using the equation E=V+IrE = V + Ir and hence V=E-Ir; the gradient of the graph gives the internal resistance of the cell.

    If the graph is extrapolated so as to cut the voltage axis, the point at which it does so gives the electromotive force(e.m.f) of the cell.


    Method 2

    Apparatus

    • Ammeter
    • voltmeter
    • variable resistor
    • cells
    • connecting wires.

    Procedure

    • Set the apparatus as shown:
    Determining of internal resistance of a cell
    Determining of internal resistance of a cell
    • Switch on the circuit and increase the current in step from a minimum value.
    • Record the corresponding voltage VV.

    Complete table

    Current I (A)
    Voltage(V)
    R=V/I
    1/I

    Plot a graph of 1I\frac{1}{I} against RR


    Results and Observation

    The graph is a straight line with a positive gradient. see the diagram below

    Graph of reciprocal of internal resistance versus Resistance

    The gradient of the graph gives 1E\frac{1}{E}

    Internal resistance can be obtained in two ways:

    (i) Extrapolating the graph to cut RR axis gives rr as can be observed on the diagram above.

    (ii) If the intercept on axis is AA, then,

    A=rEA = \frac{r}{E}

    So,r=A×Er = A \times E

    But: E=1GradientE = \frac{1}{\text{Gradient}}

    Therefore,

    r=A×1Gradientr = A \times \frac{1}{\text{Gradient}}


    Example 20

    A battery consisting of four cells in series, each of e.m.f. 2.0 V and internal resistance 0.6 Ω, is used to pass a current through a 1.6 Ω resistor. Calculate the current through the battery.

    Solution

    Current through battery = e.m.f. of batterytotal resistance\frac{\text{e.m.f. of battery}}{\text{total resistance}}

    The electromotive force(e.m.f) of the battery is the sum of the e.m.f. of all the cells while the internal resistance of the battery is the sum of all internal resistances of the cells.

    Therefore, current through the batter

    I=2.0×4(0.6×4)+1.6I = \frac{2.0 \times 4}{(0.6 \times 4)+1.6}

    I=8.04.0I = \frac{8.0}{4.0}

    I=2.0 AI = 2.0\ A


    Example 22

    A cell drives a current of 2.0 A through a 0.6 Ω resistor. When the same cell is connected to a 0.9 Ω resistor, the current that flows is 1.5 A. Find the internal resistance and the electromotive force(e.m.f) of the cell.

    Solution

    The first connection is as shown with it's internal resistance.

    when connected to 0.9 ohm resistor, the circuit is as shown:

    Taking E as the electromotive force(e.m.f) of the cell and r the internal resistance.

    E = IR+Ir

    from the below figure:

    E = (2.0 x 0.6)+2.0r = 1.2+2r --------(i)

    using the figure below:

    E = (1.5 x 0.9)+1.5r

    E = 1.35 + 1.5r ---------(ii)

    since e.m.f is the same in both circuits:

    1.2+2r = 1.35+1.5r

    2r-1.5r = 1.35-1.2

    =.5r = 0.15

    r = 0.3Ω

    substituting for r in the first equation:

    E = 1.2+2r = 1.2+2(0.3)

    E= 1.2+0.6 = 1.8V

    Example problem

    A battery consists of two identical cells, each of e.m.f. 1.5V1.5\,V1.5V and internal resistance 0.6Ω0.6\,\Omega0.6Ω, connected in parallel. Calculate the current the battery drives through a 0.7Ω0.7\,\Omega0.7Ω resistor.

    Solution

    When identical cells are connected in parallel,the equivalent e.m.f. is equal to that of only one cell.

    The figure below represents the arrangement:

    The equivalent internal resistance is equal to that of two such resistors connected in parallel as shown in the diagram above. Figure (a) is simplified to figure (b).

    Equivalent e.m.f. =1.5V= 1.5\,V

    Equivalent internal resistance will be given by:

    rT=r1r2r1+r2r_T = \frac{r_1 r_2}{r_1 + r_2}

    ​​substituting:=0.6×0.60.6+0.6= \frac{0.6 \times 0.6}{0.6 + 0.6}=0.3Ω= 0.3\,\OmegaI=ER+rI = \frac{E}{R + r}

    Current through the 0.7Ω0.7\,\Omega will be given by:

    =1.50.7+0.3= \frac{1.5}{0.7 + 0.3}=1.5A= 1.5\,A


    Example 23

    In an experiment to determine the electromotive force (E)(E) and internal resistance of a cell, the following results were obtained.

    I (A)0.51.01.52.02.5
    V (V)1.251.00.750.50.25

    Plot a graph of 1I\frac{1}{I} against RR. From the graph, determine the values of EE and rr.

    Solution

    A table for 1I\frac{1}{I}​ and RR is generated from the values given as follows:

    1I\frac{1}{I}2.01.00.670.50.4
    R=VIR = \frac{V}{I}2.51.00.50.250.1

    A plot of 1I\frac{1}{I} against RR is as follows:

    The graph is a straight line whose gradient is 1E\frac{1}{E}

    Thus,1E=2.00.752.50.65\frac{1}{E} = \frac{2.0 - 0.75}{2.5 - 0.65}=1.251.85= \frac{1.25}{1.85}

    Hence,E=1.851.25=1.48VE = \frac{1.85}{1.25} = 1.48\,V

    The value for rr is found by extrapolating the graph until it cuts the R-axis and reading off rr as indicated on the graph.


    Thus, r=0.48Ω

    Alternatively

    y=rEy = \frac{r}{E}

    Thus,r=y×Er = y \times E=0.33×1.48= 0.33 \times 1.48=0.488Ω= 0.488\,\Omega


    Practice Questions

    1. State the physical quantities whose units are;
      • ampere,
      • ohm,
      • volt,
      • coulomb and watt.
    2. State Ohm’s law and describe an experiment to verify it.
    3. For the resistor network given, determine
      (a) the total resistance
      (b) the voltage drop across each resistor.
      (c) the current through each resistor.
    1. The figure below shows four resistors and a source of voltage of 6V6\,V with internal resistance 0.2Ω0.2\,\Omega

    (a) Find the effective resistance of the circuit.
    (b) Calculate the current through rr.

    1. Six resistors are connected in a circuit as shown in the figure below.

    Calculate the:
    (a) total resistance of the circuit.
    (b) total current in the circuit.
    (c) current through the 3Ω3\,\Omega resistor.
    (d) current through the 8Ω8\,\Omega resistor.

    1. (a) You are provided with two resistors of values 4Ω4\,\Omega and 8Ω8\,\Omega.
      (i) Draw a circuit diagram showing the resistors in series with each other and with a battery.
      (ii) Calculate total resistance of the circuit (assume negligible internal resistance).

    (b) Given that the battery has an e.m.f of 6V and an internal resistance of 1.33Ω:

    calculate the current through:

    (i) 8Ω

    (ii) 4Ω resistor when the two are in parallel.

    practice questions

    Quick Check: Electromotive Force & Internal Resistance

    1. What does EMF represent?


    2. A battery has an EMF of 12 V and an internal resistance of 2 Ω. If the current is 3 A, what is the terminal voltage?


    3. Calculate the current when a battery of EMF 9 V and internal resistance 1 Ω is connected to a 8 Ω resistor.

    Related topics

  • The Unit Circle and Angles

    The Unit Circle and Angles

    Trigonometry becomes much easier when you understand the unit circle. The unit circle helps us define trigonometric ratios for all angles, including positive, negative, and angles greater than 90°.

    What Is the Unit Circle?

    A unit circle is a circle with:

    • Centre at O(0,0)
    • Radius equal to 1

    The circle is drawn on the Cartesian plane with the x-axis and y-axis crossing at the centre. see the figure below

    The unit circle illustrated

    The Four Quadrants

    The unit circle is divided into four sections called quadrants:

    • First Quadrant (Quadrant I) → top right
    • Second Quadrant (Quadrant II) → top left
    • Third Quadrant (Quadrant III) → bottom left
    • Fourth Quadrant (Quadrant IV) → bottom right

    Positive and Negative Angles

    Angles are measured from the positive x-axis.

    • An angle measured anticlockwise is positive.
    • An angle measured clockwise is negative.

    Examples:

    • 120° is a positive angle and lies in the second quadrant.
    • -50° is a negative angle and lies in the fourth quadrant.

    Determining Quadrants of Angles

    To know where an angle lies:

    First Quadrant

    Angles between 0° and 90°

    Example:
    30° lies in Quadrant I

    Second Quadrant

    Angles between 90° and 180°

    Example:
    140° lies in Quadrant II

    Third Quadrant

    Angles between 180° and 270°

    Example:
    240° lies in Quadrant III

    Fourth Quadrant

    Angles between 270° and 360°

    Example:
    330° lies in Quadrant IV

    Negative Angles

    Negative angles move clockwise.

    Example:
    -70° lies in Quadrant IV
    -120° lies in Quadrant III

    The figure below shows angles of 120o and -50o marked on the unit circle. They are in the second and fourth quadrants respectively.

    Determine which quadrants where 35o, 45o, 190o, 280o, 330o,235o are found.


    Coordinates on the Unit-Circle

    One important idea about the unit circle is that every point on the circle represents:

    (x, y) = (cos θ, sin θ)

    This means:

    • x-coordinate = cos θ
    • y-coordinate = sin θ

    Figure below is a unit-circle and angle PON=30°. Determine the values of x and y at point P.

    Angle AON is a right-angled at N. Therefore:

    A right-angled triangle is formed inside the circle.

    Since the radius of the unit circle is 1:

    OP = 1

    Using trigonometric ratios:

    $$sin 30^o = \frac{NP}{OP}=\frac{0.5}{1}$$ $$=\text{0.5 is the value of y co-ordinate of p}$$

    Now for cosine:

    $$cos 30^o = \frac{adjacent}{hypotenuese}$$ $$cos 30^o =\frac{ON}{OP} = \frac{0.86}{1}$$ $$\text{o.86 is the x cordinate of p}$$

    Therefore, the coordinates of point P are:

    P(0.86, 0.5)

    $$tan 30^o = \frac{NP}{ON}=\frac{0.5}{0.86} = 0.5814$$ $$=\frac{y \ co-ordinate}{x \ co-ordinate} \ on \ the \ unit \ circle$$

    Therefore, for a unit circle:

    sinθ = y co-ordinates of P

    cosθ = x co-ordinates of P.

    $$tan\theta = \frac{y \ co-ordinates \ of \ P}{x \ co-ordinate \ of \ P} =\frac{sin\theta}{cos\theta}$$

    Key Ideas to Remember

    • The unit circle has radius 1.
    • Positive angles move anticlockwise.
    • Negative angles move clockwise.
    • Every point on the unit circle represents: (cos θ, sin θ)
    • The x-coordinate gives cosine.
    • The y-coordinate gives sine.

    The unit-circle is the foundation for understanding trigonometric functions, graphing, and solving advanced trigonometry problems.

    Related topics

  • Ohm’s Law and Electrical Resistance

    Ohm’s Law and Electrical Resistance

    Ohm’s Law and Electrical Resistance are fundamental concepts in electricity explaining the relationship among voltage, current, and resistance. Electrical resistance describes how strongly a material opposes the flow of electric current. Understanding these concepts is essential for analyzing circuits, designing electrical systems, and explaining how electronic devices operate in everyday life.

    One of the most important principles that helps us understand how electricity behaves in a circuit is Ohm’s Law. This law explains the relationship between voltage, current, and resistance in an electrical conductor.

    Electricity powers almost every device we use today, from mobile phones and televisions to electric cars and industrial machines.

    In this lesson, we shall explore Ohm’s Law and the electrical resistance, how it is verified experimentally, the meaning of electrical resistance, and the factors that affect resistance in conductors.


    What is Ohm’s Law?

    Ohm’s Law states that:

    The current flowing through a conductor is directly proportional to the potential difference across it, provided temperature and other physical conditions remain constant.

    This means that when the voltage across a conductor increases, the current flowing through it also increases proportionally.

    The mathematical expression of Ohm’s Law is:

    V=IR

    $$I=\frac{V}{R}$$

    some of the physical conditions includes pressure and tensional forces on the conductor.

    Where:

    • V = Voltage (Volts)
    • I = Current (Amperes)
    • R = Resistance (Ohms)

    Investigating the Relationship Between Current and Voltage in ohm’s law

    To verify Ohm’s Law, a simple experiment can be carried out using a nichrome wire.

    Apparatus Required
    • Two-metre nichrome wire
    • Two dry cells
    • Ammeter
    • Voltmeter
    • Rheostat
    • Switch
    • Connecting wires

    Experimental Setup to study ohm’s law and electrical resistance

    • Using a nichrome wire, make a coil of as many turns as possible
    • Set up the circuit as shown in figure below
    https://images.openai.com/static-rsc-4/DDdIuL2Y9u5sejRlZq32FinzoRPxc2_gikN3xL2vHyrQBHwi9waK045U4W4wVnJARwXGMdci5YK0u0h8611BxnoQi5bAQYyoXX-lmqZhm_uBS3D7n9YAQZb6yCcC7zHyFNsi1ll8y4WIhfUZM9-4kVybeMA6F2v7-L-zU8gy7EolaeNS_PKfCc31W9cEEE9-?purpose=fullsize
    • Set the current flowing in the circuit to the least possible value
    • with help of the rheostat, vary in steps the current flowing in the circuit and not e the corresponding voltage drop across the coil.
    • Record the results in the table below
    Current (A)
    Voltage (V)

    Observation of ohm’s and electrical resistance

    As the current flowing through the nichrome wire increases, the voltage across the wire also increases. When voltage is plotted against current, the graph obtained is a straight line passing through the origin.

    https://images.openai.com/static-rsc-4/uezHkhOf0Vlod6XuaYNMkt0n4MWN4b9NtPkEmXRNs4AmVJG9YhUovpd4T4uJ901t3QVyabBYG0wXk7t2ZVYqCkcChwUFsXEtJasm6granJ_JwAqwODKTtrcW0EcFpaqFvKLvbL-0jycSdAdF4v00yx92gRgbiukNeAmdCvfYOxnX85wf6HhbBtUMjv7SBHhh?purpose=fullsize

    The table below represents a sample data from such an experiment.

    Current (A)0.10.20.30.4
    Voltage (V)1.22.43.64.8

    when this data is plotted on a grid, a graph as shown is obtained.

    graph to study electrical resistance

    Points to note:

    The circuit is connected such that:

    • The ammeter measures the current flowing through the wire.
    • The voltmeter measures the voltage across the nichrome wire.
    • The rheostat is used to vary the current in the circuit.

    Data Analysis and conclusions

    The gradient of the graph will be given by:

    $$Gradident = \frac{\Delta voltage}{\Delta current}$$ $$=\frac{4.2-1.0}{0.35-0.085} = \frac{3.2}{0.265} = 12.075VA^{-1}$$

    from the graph, the following observations can be obtained:

    As the current increases, the voltage across the coil also increases.

    The graph obtained when voltage is plotted against current is a straight line passing through the origin.

    Therefore:

    • voltage is directly proportional to current
    • gradient of the graph is a constant. This constant gives the resistance of the conductor used.


    https://images.openai.com/static-rsc-4/HkVvdN8rfcbb5AU_9J_f4Cs6zIWeE2WrXm8nVMH08R9ym9d0BnS4KKLdpgsBP4QkWoo48UCNJ-WHr5SV1ZzVmfrmfByRuUEpPTqPrGt699yfkI_YLF1-Uwda6mpVjLrnBQdCkQwzkm7A0K_HVdJ2H5Gil2s8gSjE39d1zAwfnjKleYcC-IRGXWpkmEMJsOtE?purpose=fullsize

    This straight-line graph confirms that voltage is directly proportional to current.


    Understanding Resistance

    From the experiment, the ratio of voltage to current remains constant. We can verify the ohm’s law with the same procedure described above when we replace a coil with a standard resistor. The graph of current against voltage is a straight line through the origin.

    $$\text{The gradient of the graph,} \ \frac{\Delta I}{\Delta V} \text{ gives the reciprocal of resistance }$$ $$\text{The reciprocal of resistance is what is known as the conductance (S) }$$ $$\text{conductance is measured in Siemens }(\Omega^{-1})$$

    From the graph above:

    $$resistance = \frac{1}{Gradient}$$

    From V I:

    V=constant(K)x I

    The constant which we represent with K is the resistance of the conductor.

    hence;

    V=IR where V is the potential difference across the conductor.

    Resistance can therefore be calculated using:

    $$Resistance R = \frac{Volatge(V)}{Current(I)}$$

    The SI unit of resistance is the ohm (Ω).

    An ohm is defined as the resistance of a conductor when a current of 1A flowing through it produces a voltage drop of 1 V across it’s ends.

    A conductor is said to have a resistance of 1 ohm if a current of 1 ampere flows through it when a potential difference of 1 volt is applied across it.

    an ohm have some other units like:

    1 kilo ohm(KΩ) = 1000Ω

    1 mega ohm(MΩ) = 1 000 000Ω

    Worked Examples

    Example 1

    A current of 2 mA flows through a conductor of resistance 2 kΩ. Calculate the voltage across the conductor.

    solution:

    Using Ohm’s Law:

    V=IR

    $$2 \times 10^{-3} \times 2 \times 10^3 = 4V$$


    Example 2

    Calculate the current flowing through a 50 Ω resistor connected to a 10 V battery.

    solution

    from ohm’s law:

    $$I= \frac{V}{R} = \frac{10}{5} = 2.0A$$


    Example 3

    A starter motor requires a current of 50 A from a 12 V battery. Determine the resistance of the motor.

    solution

    $$I = \frac{V}{R} = \frac{12}{50} = 0.4\Omega$$

    Ohmic and Non-Ohmic Conductors

    Ohmic Conductors

    Conductors that obey Ohm’s Law are called Ohmic conductors.

    Examples include:

    • Nichrome wire
    • Metallic resistors

    For these conductors, the graph of voltage against current is a straight line.


    Non-Ohmic Conductors

    Some conductors do not obey Ohm’s Law. These are known as Non-Ohmic conductors.

    Examples include:

    • Filament lamps
    • Thermistors
    • Semiconductor diodes
    • Electrolytes

    Their voltage-current graphs are curved instead of straight.

    https://images.openai.com/static-rsc-4/UAOMfAZfyzTS5xTfn8tJX4T4FgSI7B27x_l1jQ8WrcJUBdbcoDzxFIV4UfNHnV0KEw1_nwzuCUTi-weEjdl-lGt6w89sYOlAr1LcyKGpMivgt2-A9qfdnIcsBPkqOUaY7A8Nf0nJhT6yxSbDgflIlnO6RkZWXFb9wyfbJ2h5NIAd3o7wBV3HVG9CVUyycMrA?purpose=fullsize
    https://images.openai.com/static-rsc-4/0Qye9eQqnDdPvSc4xmstJdU7pBb5aiY7li9K_HCkTRs87gQOUzPKNI8S8eSVUO-hIZqcoD_fIhnzewoIDB-fKy_an-QyE6UAbrTiiUgQjyaL1agu9X5ss9JW3BD_Ay3Jb1tY7IgocRgMQn5kmP18MN_BvmDcIGXycMXgZpasFFz7FCfT6SCeueFQf3XxqLVt?purpose=fullsize
    https://images.openai.com/static-rsc-4/IIgbCZFTVbVqfHVahbdtI4C7-O411l3xkdpzke_ixyYxRoRhfWF0SECxeWKBjHWgMf9HgvYY5tjbOC4LBjq_xfLpXPF8g-jCWpnyVgaIDAF8ZYWBQSrSPef-w9MIvwSMHyS_tkhi43bmNFwgSUd3udKAdyqriZpmFBL_x5tVyjCM9_T1TIdxewappn1WK3vO?purpose=fullsize

    Electrical Resistance

    Electrical resistance is the opposition offered by a conductor to the flow of electric current.

    Resistance occurs because electrons moving through a conductor collide with atoms and impurities inside the material. These collisions reduce the flow of charge and produce heat energy.

    Electrical Resistance Animation

    Electrical Resistance Animation

    This animated illustration demonstrates how electrical resistance occurs inside a conductor. Electrons flowing through the wire collide with vibrating atoms, causing opposition to current flow.

    Electrons collide with vibrating atoms, producing resistance and heat.
    V = IR

    How Electrical Resistance Works

    In a metallic conductor, electric current is carried by moving electrons. As these electrons move through the wire, they collide with atoms and impurities present in the conductor.

    These collisions oppose the movement of electrons and reduce the flow of electric current. This opposition is called electrical resistance.

    When temperature increases, atoms vibrate more strongly, causing more collisions and therefore increasing resistance.

    An instrument used to measure resistance is called an ohmmeter.

    An ohmmeter
    https://images.openai.com/static-rsc-4/wfdJgSYDJeWrdj0dRAsYragM0hHAx53-Vwco7obMK0HYMXY0PSi3XN3HTKsrfaKOjgYBPwZEO64TkyZhEm1FAIHWa3OkZGDCiMgeF9CeOAOQO6EU0XHMFmSCb6svpo50Cow2uVLv7lQMDdpy-TFmXEMfvLzpNHXfnboAk9QIHBo_pePWp7mdWzSJBJHOeeif?purpose=fullsize
    https://images.openai.com/static-rsc-4/HMn9yOU4X1TeUsNXx14ODEmVFhrTPtwxXcKPi38xrtutswiXU8IWdgx5HA7-toNUOYIdRlys5fe04hLoAhuKm4MnZHkCj2D5ujKzbBs3DkJrJp2ZrqiImmuz93VSWjv5AON1vhZ3A1e7_w2aaDlUeaTSydxAkJQTXzk_Rx7R3n9RGzbkmcgWVk1YBEXHU4FM?purpose=fullsize

    5


    Factors Affecting Resistance

    Several factors determine the resistance of a conductor.


    1. Length of the Conductor

    The resistance of a conductor increases with its length.

    that is: R ∝ l

    hence; resistance = constant x length

    i.e = R = Kl ————————(i)

    for a given conductor:

    $$\frac{R}{l} = constant$$

    As the length of the conductor increases, the resistance increases because of the increased number of atoms that are available to hinder the flow of electrons.

    A longer wire contains more atoms that obstruct the movement of electrons, leading to greater resistance.


    2. Cross-Sectional Area

    Resistance decreases when the cross-sectional area increases A.

    That is: resistance is inversely proportional to cross section area(A) of the conductor.

    $$R \propto \frac{l}{A}$$

    A conductor with a larger cross-section area(A) has many free electrons for conduction, hence better conductivity.

    $$RA = K———————-(ii)$$

    Thicker wires allow more electrons to flow easily and therefore have lower resistance.

    Combining (i) and (ii) for a conductor with uniform cross-section area;

    $$R = K(\frac{l}{A})$$

    The constant value in the equation above is referred to as the resistivity(ρ)of a material. It is practically the resistance of sample of a material of unit length and unit cross-section area at a given temperature. The unit of measurement for resistivity(ρ) known as ohmmeter(Ωm).

    The table below shows resistivity of some common materials

    Material Resistivity (Ωm) Common Uses
    Silver1.6 × 10⁻⁸Contacts on some switches
    Copper1.7 × 10⁻⁸Connecting wires
    Aluminium2.8 × 10⁻⁸Power cables
    Tungsten5.5 × 10⁻⁸Lamp filaments
    Constantan49 × 10⁻⁸Resistance boxes, variable resistors
    Nichrome100 × 10⁻⁸Heating elements
    Carbon3,000 × 10⁻⁸Radio resistors
    Glass10¹⁰ – 10¹⁴Electrical insulators
    Polystyrene10¹⁵Electrical insulators

    Example problem in resistance

    Two wires of A and B are such that the radius of A is twice that of B and the length of B is twice that of A. if the two are of the same material, determine the ratio:

    $$\frac{resistance \ of \ A}{resistance \ of \ B}$$

    solution:

    $$since \ \frac{RA}{l} = constant:$$ $$\frac{R_A A_A}{l_A} =\frac{R_B A_B}{l_B}$$

    Therefore, after rearranging the expression:

    $$\frac{R_A}{R_B} = \frac{l_A A_B}{l_BA_B} = \frac{l_A (R_B)^2}{l_B (R_A)^2}$$

    since lB = 2lA ; 2RB = RA

    $$\frac{R_A}{R_B} = \frac{l_A \times (\frac{1}{2}R_A)^2}{2l_A \times (R_A)^2}$$ $$\frac{R_A}{R_B} = \frac{l_A \times (\frac{1}{4})}{2l_A } = \frac{\frac{1}{4}}{2} = \frac{1}{8}$$
    https://images.openai.com/static-rsc-4/BxAzoS60KTc3H3Y2W804QrHxpYbw6VtXQRBpNxhXbVtaxq9yT7q_BC3xjowgFhRfJgr-gY0jJI3ts_MSDJ8tFf7wLEUFKXhNKAFAawZqKY1ykmVDPPnrK49DrzU4o5dY_M9x7sNGI6h4PNfuKtPUJersx4s7czU1CgCPhCisOzjDKXpGYlXRV89gRLBpJ-3t?purpose=fullsize
    illustrating electrical resistance


    3. Temperature

    For metallic conductors, resistance increases with temperature.

    Heating causes atoms in the conductor to vibrate more vigorously. This increases collisions between electrons and atoms, making it more difficult for current to flow.


    Resistivity of Materials

    Resistivity is a property that shows how strongly a material opposes electric current.

    Materials such as:

    • Silver and copper have low resistivity and are good conductors.
    • Glass and polystyrene have high resistivity and act as insulators.

    Temperature also affects resistance:

    • In metals, resistance increases with temperature.
    • In semiconductors, resistance decreases with temperature.

    Resistors

    A resistor is an electrical component designed to provide resistance in a circuit.

    Resistors are used to:

    • Control electric current
    • Reduce voltage
    • Protect circuit components
    • Produce heat in appliances

    Most wire-wound resistors are made using materials such as:

    • Manganin
    • Constantan

    These materials are preferred because their resistance changes very little with temperature.


    Fixed Resistors

    Fixed resistors have a constant resistance value.

    Types of Fixed Resistors

    1. Wire-Wound Resistor

    This resistor is made by winding resistance wire around an insulating core.

    Features:

    • High durability
    • Can handle large currents
    • Common in power circuits
    2. Carbon Resistor

    Made using carbon material.

    Features:

    • Cheap and widely used
    • Small in size
    • Used in electronic circuits

    Resistor Symbol

    The electrical symbol of a resistor is represented by a zigzag or rectangular shape depending on the standard used.


    Variation of Resistance with Temperature

    Different materials respond differently to temperature changes.

    Metals

    Resistance increases as temperature rises.

    Thermistors

    Resistance decreases as temperature rises.

    Constantan

    Resistance remains nearly constant despite temperature changes.

    This behavior is important in designing temperature-sensitive circuits.


    Variable Resistors

    A variable resistor allows resistance to be adjusted manually.

    The resistance changes when a sliding contact moves along the resistance track.

    Applications include:

    • Volume controls in radios
    • Light dimmers
    • Fan speed regulators

    Rheostat

    A rheostat is a variable resistor with two terminals.

    It is used to control current in a circuit.

    As the slider moves:

    • The effective length of the resistance wire changes
    • Resistance changes accordingly

    Increasing the resistance reduces current flow.


    Potentiometer

    A potentiometer is a variable resistor with three terminals.

    It is used to:

    • Divide voltage
    • Control signal levels
    • Adjust volume in audio systems

    How It Works

    A sliding contact moves along the resistor track, selecting different voltage levels.

    Potentiometers are commonly used in:

    • Audio amplifiers
    • Electronic control systems

    Non-Linear Resistors

    These resistors do not obey Ohm’s Law strictly because their resistance changes non-linearly with voltage, temperature, or light.

    Examples include:

    • Thermistors
    • Light-dependent resistors (LDRs)

    Thermistor

    A thermistor is a temperature-dependent resistor.

    Characteristics
    • Resistance decreases as temperature increases.
    • Used in heat-sensitive circuits.
    Applications
    • Temperature sensors
    • Fire alarms
    • Electronic thermometers

    Light-Dependent Resistor (LDR)

    An LDR changes resistance according to the amount of light falling on it.

    Characteristics

    • High resistance in darkness
    • Low resistance in bright light

    Applications

    • Automatic street lights
    • Camera light sensors
    • Burglar alarms


    Importance of Resistors in Daily Life

    Resistors are found in almost every electrical and electronic device.

    They help to:

    • Protect circuits from excessive current
    • Control electrical energy
    • Improve device performance
    • Enable automatic sensing systems

    Without resistors, modern electronics would not function safely or efficiently.


    Resistors play a vital role in electrical and electronic circuits. From fixed resistors to thermistors and LDRs, these components help control current, voltage, temperature, and light sensitivity in devices we use every day.

    Understanding how resistors work gives students a strong foundation in physics and electronics, preparing them for more advanced studies and practical applications in technology.


    Conclusion

    Ohm’s Law is one of the most fundamental principles in electricity and electronics. It helps us understand how voltage, current, and resistance are related in electrical circuits. Through experiments and graphical analysis, students can clearly observe the direct relationship between voltage and current in Ohmic conductors.

    Understanding electrical resistance and the factors affecting it is essential in designing safe and efficient electrical systems used in homes, schools, laboratories, and industries.

    Whether you are studying basic physics or advanced electronics, mastering Ohm’s Law provides the foundation for understanding the behavior of electric circuits.

    Related Topics

    illustrating ohm's law and electrical resistance
  • Pressure in liquids: How depths affects pressure

    Pressure in liquids: How depths affects pressure

    Pressure in liquids is a fascinating concept that explains why divers feel greater force underwater and why dams are built thicker at the bottom than at the top. As depth increases, the pressure exerted by a liquid also increases because more liquid presses down from above.

    This principle plays an important role in everyday life, engineering, and natural water systems. Understanding how depth affects pressure helps us explain many real-world phenomena, from submarine design to the flow of water in oceans and rivers.

    At the same depth in a given liquid, differences in levels obtained is the same regardless of the direction which the funnel faces.

    To investigate the variation of liquid pressure with depth and density

    Apparatus

    A tall jar, liquids of different densities, thistle funnel, U-tube, rubber tubing.


    Procedure

    • Using the nail, make three holes, A, B and C, of the same diameter along a vertical line on one side of the tin.
    • Fill the tin with water as shown in figure 4.3.
    • With the tin full of water, observe the jets of water from the holes A, B and C.

    Observation

    The lower hole, A, throws water farthest, followed by B

    Conclusion

    Pressure in liquids increases with density and depth.

    In summary:

    1. Pressure in a liquid increases with depth below its surface.
    2. Pressure in a liquid at a particular depth is the same in all directions.
    3. Pressure in a liquid increases with the density of the liquid.

    Fluid Pressure Formula

    Consider a liquid in a container, as shown in figure 4.8.

    If A is the cross-sectional area of the column, h the height of the column and ρ the density of the liquid, then:

    Volume of the liquid= cross-sectional area × height
    = Ah

    Mass of the liquid=volume of the liquid × density
    = Ahρ

    Therefore, weight of the liquid
    = mass of the liquid × gravitational force per unit mass
    = Ahρg

    From the definition of pressure:

    $$ P = \frac{F}{A} = \frac{Ah\rho g}{A} $$

    So fluid pressure becomes:

    P=hρgP=h\rho gP=hρg


    EXPERIMENT To show the distribution of pressure at a point in a liquid

    Apparatus

    A tall jar, water, thistle funnels, U-tube, rubber tubing.

    Procedure

    • Fill the glass vessel G with water.
    • Connect one of the thistle funnels to a U-tube filled to some level with water.
    • Lower the funnel to a depth from the surface of water and notice the difference in levels, h, of the water in the U-tube.
    • Replace the funnel with others, in turn, whose mouths are pointing in different directions.
    • Lower the funnel into the water so that the mouth of the funnel is at the same point as the straight one. Observe the difference in levels of the water in the U-tube.

    Figure 4.6: Pressure variation in a liquid

    Procedure

    • Fill the glass vessel G with water.
    • Connect the thistle funnel to a U-tube filled to some level with water.
    • Lower the funnel to different depths from the surface and notice the difference in levels, h, of water in the U-tube.
    • Replace water in G with a denser liquid, such as sodium chloride solution (brine).
    • Lower the funnels to the same depths as above and compare the heights obtained.

    Observations

    1. The deeper the funnel goes below the surface, the greater the difference in levels, h.
    2. The differences in levels, h, obtained with brine at a particular depth is greater than that obtained with water at that depth.

    Liquid Levels in a U-tube

    When water is poured into a U-tube, it will flow into the other arm. The water will settle in the tube with the levels on both arms being the same, see figure 4.5(a).

    illustrating pressure in liquid
    illustrating pressure in liquids by use of u-tube glass tube

    When one arm of the U-tube is blown into with the mouth, the level moves downwards, while on the other arm it rises, see figure 4.5(b). This is caused by the pressure difference between the two arms. The pressure increases on the arm that is blown into and causes water to rise on the other arm.


    Effect of pressure on liquid levels

    Pressure of water at A is greater than pressure at B and pressure at B is greater than at C. Hence, pressure increases with depth.

    For this reason, a diver at the bottom of the dam experiences pressure due to the weight of water above him. The deeper the diver goes, the greater the pressure.


    Liquid Levels

    When a liquid is poured into a set of connected tubes with different shapes, it flows until the levels are the same in all the tubes, as shown in figure 4.4.

    illustrating the liquid levels  due to pressure

    Related topic

  • An inclined plane as simple machines

    An inclined plane as simple machines

    An inclined plane is one of the simplest yet most useful machines in everyday life. It is a flat surface set at an angle to help move heavy objects from a lower level to a higher level with less effort. Instead of lifting a load straight upward, an inclined plane allows force to be applied over a longer distance, making work easier and more efficient. Common examples include ramps, staircases, sloping roads, and playground slides. Inclined planes have been used since ancient times in construction, transportation, and engineering, and they continue to play an important role in modern technology and daily activities.

    solving problems involving inclined plane

    Consider an inclined sheet of metal placed to form a slope to ease the process of loading heavy luggage onto a truck as in the diagram below:

    The velocity ratio of the inclined plane will be given by:

    $$Velocity \ \ ratio(V.R) = \frac{\text{distance travelled by effort}}{\text{distance travelled by load}}$$ $$ =\frac{\text{length l of the plank}}{\text{vertical height h}} = \frac{l}{h}$$

    From trigonometric ratios:

    $$sin \theta = \frac{h}{l}$$ $$hence; \ h = lsin \theta$$

    substituting for h in the denominator:

    $$V.R = \frac{l}{lsin \theta} = \frac{1}{sin \theta}$$
    Experiment To find the mechanical advantage of an inclined plane
    Apparatus
    • A pulley
    • string
    • two metre rules
    • weighing balance
    • flat plane
    • five blocks of wood of different masses
    • pan
    • sand

    Procedure of find the mechanical advantage of an inclined plane
    • Fix the flat plane at an angle of inclination of about
    • Place the load L in on an inclined plane and tie it with a string running over a pulley and attached to a pan, as in figure below:
    • Add sand to the pan until the load moves steadily up the incline.
    • Measure the load and the effort (pan + sand) using a weighing balance. Record the results on the table shown in table.
    Table 2.1: Finding M.A. of an inclined plane
    Load L(N)Effort E (N)M.A = E/L

    • Repeat the experiment for other values of LL and EE.
    • Calculate the M.A. for each pair of values.


    Observation

    The ratio of load to effort is found to be a constant, i.e.

    $$M.A = \frac{L}{E}$$


    Experiment To find the velocity ratio of an inclined plane

    Apparatus
    • A pulley
    • two metre rules
    • two blocks of wood
    • one small and the other big
    • pan
    • sand.

    Procedure of finding the velocity ratio of an inclined plane
    • Fix a flat plane at an angle of inclination of 30∘.
    • Place a block of wood on the plane and tie it with a string running over the pulley and attached to the pan, as shown in figure below:
    Determining the velocity ratio of an inclined plane
    • Add sand to the pan until the load moves steadily up the incline.
    • When the load stops moving, record lengths DLD_L​ and DED_E.
    • Add more sand so that the effort (pan with sand) moves further down.
    • Measure the DLD_LDL​ and DED_EDE​ for the new positions.
    • For each pair of values, calculate the velocity ratio, as shown below;
    $$V.R = \frac{D_E}{D_L}$$
    Distance moved by effort DE(cm)Distance moved by load DL(cm)V.R = DE\DL

    Example 20

    A man uses the inclined plane to lift a 50 kg load through a vertical height of 4.0 m. The inclined plane makes an angle of 30° with the horizontal. If the efficiency of the inclined plane is 72%, calculate:

    (a)The effort needed to move the load up the inclined plane at a constant velocity.

    (b) The work done against friction in raising the load through the height of 4.0 m.

    Take: g = 10Nkg-1

    solution

    (a)

    picture the setup as in the figure below:

    showing an inclined plane being used as a simple machine

    /

    $$V.R = \frac{1}{sin \theta} =2$$ $$M.A = effecicency \ \times V.R = \frac{72}{100} \ \times 2 = 1.44$$ $$Effort = \frac{load}{M.A} = \frac{50 \times 10}{1.44}$$ $$=347.2N$$

    (b)

    Work done against friction = work input – work output

    work output = mgh = 50 x 10 x 4 = 2000J

    work input = effort x distance moved by effort

    = 327.2 x AC

    $$347.2 \ \times \frac{4}{sin 30^o}$$

    Therefore, the work done against friction = 2777.6 – 2000 = 777.6J

    Related Topics

  • Measuring  Resistance in Electric Circuits

    Measuring Resistance in Electric Circuits

    Electric resistance is one of the most important concepts in current electricity. Resistance determines how easily electric current flows through a conductor. In physics laboratories, several methods are used to measure resistance accurately, including the voltmeter-ammeter method, the Wheatstone bridge method, and the metre bridge method. These techniques form the foundation for understanding electrical circuits and practical electrical measurements.


    The Voltmeter-Ammeter Method of Measuring Resistance in Electric Circuits

    Aim of the Experiment

    To determine the resistance of a resistor using a voltmeter and an ammeter.


    Apparatus Required

    • Two cells
    • Switch
    • Voltmeter
    • Ammeter
    • Variable resistor
    • Resistor (R)

    Circuit Arrangement for Measuring Resistance in Electric Circuits

    In this method:

    • The ammeter is connected in series with the resistor to measure current.
    • The voltmeter is connected across the resistor to measure potential difference.
    • A variable resistor is used to vary the current flowing through the circuit.
    Image
    Image
    Image
    Image
    Image
    Image

    Procedure
    1. Set up the circuit as shown in the diagram.
    2. Keep the switch open and note the voltmeter reading (V) and the corresponding ammeter reading (I).
    3. Close the switch.
    4. Adjust the variable resistor and record several values of voltage and current.
    5. Calculate the value of (\frac{V}{I}) for each reading.
    6. Plot a graph of voltage (V) against current (I).
    7. Determine the slope (gradient) of the graph.

    Observation

    When the switch is open, no current flows through the resistor. Therefore:

    • Ammeter reading = 0
    • Voltmeter reading = 0

    As current increases, the voltage across the resistor also increases.

    According to Ohm’s law:

    $$R = \frac{V}{I}$$

    in other words; The resistance is obtained by dividing the voltage across the resistor by the current flowing through it.


    Graph of Voltage Against Current

    The graph of (V) against (I) is a straight line passing through the origin.

    V=IR

    The slope (gradient) of the graph gives the resistance of the resistor.


    Limitation of the Method

    This method is not perfectly accurate because the voltmeter draws a small amount of current. Therefore, not all the current measured by the ammeter passes through the resistor.


    The Wheatstone Bridge Method

    The Wheatstone bridge is a more accurate method of measuring resistance.

    It consists of:

    • Four resistors
    • A galvanometer
    • A cell
    Image
    lab setup for measuring electrical resistance using Wheatstone metre bridge

    operation of the Wheatstone bridge

    Wheatstone bridge operations involves making adjustments to one or two of the resistors until there is no deflection in the galvanometer. The four resisters K,L,M and N are joined as shown.

    measuring resistance by use of Wheatstone bridge setup

    If K is the unknown resistance, the value of L, M and N must be known. Alternatively, the ratio of M to N must be known. A galvanometer G and a cell are connected as in figure above.

    Variable resistor L(resistance box) is adjusted till there is no deflection in the galvanometer G. The bridge is then said to be balanced. At the state of balance, no current is flowing through G, hence the potential difference across BD is zero. When this happens, the potential difference across AB = potential difference across AD. The same current I1 flows through K and L and current I2 flows through M and N. then:

    I1 = I3 and I2 = I4

    I1k = I2M and I3L = I4N

    $$\frac{I_1K}{I_1L} = \frac{I_2M}{I_2N}$$

    As one can see, the currents are cancelling each other. hence when the bridge is balanced:

    $$\frac{K}{L} = \frac{M}{N}$$
    Image
    Image

    points to note

    The four resistors are connected in a bridge arrangement.

    When the galvanometer shows no deflection:

    • The bridge is said to be balanced.
    • No current flows through the galvanometer.
    • This equation is used to determine an unknown resistance.

    Wheatstone bridge is more accurate in measuring resistance compared to voltmeter-ammeter method because the value obtained does not depend on the accuracy of the current measuring instrument.


    Advantages of the Wheatstone Bridge

    • It gives more accurate measurements.
    • The result does not depend greatly on the accuracy of the galvanometer.
    • It is suitable for measuring small resistances precisely.

    The Metre Bridge method of Measuring Resistance in Electric Circuits

    The metre bridge is a practical form of the Wheatstone bridge.

    It uses:

    • A uniform wire one metre long
    • Two resistors
    • A galvanometer
    • A jockey (movable contact)
    Image
    Image
    Image

    Working Principle

    A typical setup of the metre bridge is shown in the figure below:

    The wire AC of uniform cross-section area and length 1 m with a resistance of several Ohm’s and made of an alloy such as constantan. The length AD represents resistor M while the length CD represents resistor N. The ratio of M to N is altered by changing the position D on the wire of the movable contact D called ‘jockey’.

    The other arm of the bridge contains an unknown resistor K and a known resistor L. The copper strips of low resistance connect the various parts. The position of D is adjusted until there is no deflection in G. Then;

    $$ \frac{K}{L} = \frac{M}{N} = \frac{\text{resistance of AD}}{\text{resistance of DC}} $$

    Since the wire is uniform cross-section, its resistance will be proportional to its length hence:

    $$ \frac{K}{L} = \frac{AD}{DC} = \frac{X_1}{X_2} \ \ \ \ \ \ Thus, K = \frac{L X_1}{X_2} $$

    The resistor L should be chosen to give balance points near the centre of the wire. This gives a more accurate result. After obtaining the balance, K and L should be interchanged and a second pair of values for X1X_1​ and X2X_2​ obtained. This average of the value eliminates errors due to non-uniformity of the wire and end corrections. In finding the balance point, the cell key or switch should be closed before the jockey makes contact with the wire. This is necessary because of the effect known as ‘self-induction’ in which the currents in the circuit take a short time to grow to their steady values. A high resistance should always be joined in series with the galvanometer to protect it from damage whilst the balance is being sought.

    Precautions in Using the Metre Bridge

    • Choose balance points near the centre of the wire for greater accuracy.
    • Close the switch before the jockey touches the wire.
    • Use a high resistance in series with the galvanometer to protect it from damage.

    Worked Example

    In an experiment to determine the resistance of a nichrome wire using the metre bridge, the balance point was found to be at 38 cm mark. If the value of the resistance in the right hand gap needed to balance the bridge was 25 Ω, calculate the value of the unknown resistor.

    solution

    picture the setup to be as shown in the diagram below:

    Since AB = 100 cm and AC = 38 cm, BC = 100 − 38 = 62 cm;

    $$ \frac{R}{38} = \frac{25}{62} $$ $$ R = \frac{38 \times 25}{62} $$ $$ R = 15.32\Omega $$

    Resistors Connected in Series

    When resistors are connected end to end, they form a series circuit.

    Characteristics of series connection:

    • The same current flows through all resistors.
    • The total voltage equals the sum of individual voltages.
    Image
    Image
    Image
    Image
    Image

    Using Ohm’s law:

    [
    V_T = V_1 + V_2 + V_3
    ]

    The total resistance in series is:

    genui{“math_block_widget_always_prefetch_v2”:{“content”:”R_T=R_1+R_2+R_3″}}


    Conclusion

    The measurement of resistance is an important practical skill in electricity. The voltmeter-ammeter method provides a simple way to determine resistance using Ohm’s law, while the Wheatstone bridge and metre bridge offer greater precision. Understanding these methods helps students appreciate how electrical measurements are carried out in laboratories and real-world electrical systems.

    Related topics

  • The consumption and cost of electrical energy

    The consumption and cost of electrical energy

    Energy is measured in joules (J). Power is measured in watts (W). You will recall that power is the rate of energy transfer or power = energy ÷ time and that 1 W is the power when 1 J of energy is being transferred every second.

    $$1W =1Js^{-1}$$

    The amount of energy used by a consumer depends on:

    (i) Power rating of appliances.
    (ii) Time for which they have been used.

    Therefore, it follows that the amount of energy consumed by a device (an electric lamp, for example) is equal to its power multiplied by the time for which it has been operating:Energy=power×time\text{Energy} = \text{power} \times \text{time}

    An alternative unit for energy is thus the watt-second (Ws) since 1 J = 1 W × 1 s.

    In 10 seconds, a 100 watt light bulb consumes:100W×10s=1000Ws100 W \times 10 s = 1\,000 Ws

    But watt-second is too small a unit for practical use. The unit used in practice is the kilowatt-hour (kWh). This is not an SI unit but is used all over the world.

    One kWh is the amount of electrical energy used in one hour (3 600 s) at a power of 1 kW (1 000 W):1kWh=1000W×3600s=3.6×10⁶J1 kWh = 1\,000 W \times 3\,600 s = 3.6 \times 10^6 J

    If we know the power rating of an appliance and the time for which it is used, the consumption in kWh is easily calculated.

    Electricity companies charge by the kilowatt-hour for the use of the power they produce — they call 1 kWh a unit. So the cost of using an appliance for a certain length of time is worked out using total cost = number of kWh × cost per unit.

    An electricity meter records the total number of units consumed on the premises where it is located.

    An electricity meter reading units (kWh) is as illustrated below:


    Example 5

    A 1 200 W hair dryer is used for 15 mins. What is the energy used by the dryer?

    Answer

    $$Energy = power(p) \times time(t)$$ $$time = 15 \times 60$$ $$Energy = 1200 \times 15 \times 60 = 1080000J$$

    Example 6

    Two 40 W bulbs are left on for 6 hours. How much energy will they consume?

    Answer

    time in seconds = 6hours x 60min x 60secs = 21600 seconds

    E = power x times

    power = 40W x 2 = 80W

    Energy(E) = 80 x 21600 = 2028000J

    $$Energy \ in \ kilowatts = \frac{2028000}{1000}=2028Kw$$


    Example 7

    An electric heater is used for 45 minutes. If it consumes 2 250 kJ of energy within this time, calculate its power rating.

    Answer

    E=ptP=EtE = pt \therefore P = \frac{E}{t}P=2250J45/60P = \frac{2\,250 J}{45/60}P=2250×6045P = \frac{2\,250 \times 60}{45}=3000W= 3\,000 W=3kW= 3 kW


    Problems on mains electricity

    Example 8

    If one unit of electricity costs sh 3.5, calculate the cost of using:

    a) a 60 W light bulb
    b) a 1 kW heater

    for 30 minutes each.

    Answer

    a)

    Power = 60 W=601000kW= \frac{60}{1\,000} kW

    Time = 30 min=3060h= \frac{30}{60} h

    Energy consumed=601000kW×3060h= \frac{60}{1\,000} kW \times \frac{30}{60} h=0.03kWh= 0.03 kWh

    Cost = number of kWh × cost per unit=0.03×3.5=sh0.105= 0.03 \times 3.5 = sh 0.105

    b)

    Power = 1 kW

    Time = 30 min=3060=0.5h= \frac{30}{60} = 0.5 h

    Energy consumed:=1kW×0.5=0.5kWh= 1 kW \times 0.5 = 0.5 kWh

    Cost = number of kWh × cost per unit=0.5×3.5=sh1.75= 0.5 \times 3.5 = sh 1.75


    Example 9

    A home has the following appliances:

    a) A heater (5 kW)
    b) Iron box (2.5 kW)
    c) Home heater system (1 kW)

    What fuse would be required for each appliance if the appliance draws power from 240 V mains supply?

    Answers

    a) 5 kW heater

    P=VIP=PVP = VI \therefore P = \frac{P}{V}I=5000240=20.83AI = \frac{5\,000}{240} = 20.83 A

    Fuse should be 25 A.

    b) 2.5 kW iron box

    I=PVI = \frac{P}{V} =2500240= \frac{2\,500}{240}=10.42A= 10.42 A

    Fuse should be 15 A.

    c) 1 kW home heater

    I=1000240I = \frac{1\,000}{240} =4.2A= 4.2 A

    Fuse should be 5A.

    Example 4

    A consumer has the following appliances operating in his house for the times indicated in one day:

    ApplianceTime
    Two 40 W bulbs30 min
    One 500 W fridge10 hrs
    Four 75 W bulbs3 hrs
    One 3 kW electrical heater45 min
    One 100 W television5 hrs

    Calculate:

    (a) the total power of the appliances used.
    (b) the total electrical power consumed in kWh in 30 days, assuming that the power consumption per day is the same.


    Solution

    (a)

    Total power=(2×40)+(1×500)+(4×75)+(1×3000)+(1×100)= (2 \times 40) + (1 \times 500) + (4 \times 75) + (1 \times 3000) + (1 \times 100)=(2×40)+(1×500)+(4×75)+(1×3000)+(1×100) =3980W= 3\,980 W=3980W


    (b)

    Total energy consumed in one day equals the sum of energy consumed by each appliance.

    Two 40 W bulbs for 30 minutes:

    2×401000×30602 \times \frac{40}{1000} \times \frac{30}{60}2×100040​×6030​ =0.04 kWh= 0.04 \text{ kWh}=0.04 kWh

    One 500 W fridge for 10 hours:

    1×5001000×101 \times \frac{500}{1000} \times 10 =5 kWh= 5 \text{ kWh}=5 kWh

    Four 75 W bulbs for 3 hours:

    4×751000×34 \times \frac{75}{1000} \times 3 =0.90 kWh= 0.90 \text{ kWh}

    One 3 kW heater for 45 minutes:

    1×3×45601 \times 3 \times \frac{45}{60}=2.25 kWh= 2.25 \text{ kWh}

    One 100 W television for 5 hours:

    1×1001000×51 \times \frac{100}{1000} \times 5 =0.50 kWh= 0.50 \text{ kWh}

    Total energy consumed in one day:=8.69 kWh= 8.69 \text{ kWh}

    Hence, the electrical energy used in 30 day will be given by:

    8.69 x 30= shs 260.7

    Revision exercise

    “`html

    Electrical Energy & Power Quiz

    Test your understanding of electrical energy, power, kilowatt-hour and mains electricity.
    1. What is the SI unit of energy?
    2. Power is defined as:
    3. A 100 W bulb operates for 10 seconds. How much energy does it consume?
    4. One kilowatt-hour is equal to:
    5. A 1 200 W hair dryer is used for 15 minutes. What is the energy used?
    6. Electricity companies charge consumers using which unit?
    7. Two 40 W bulbs are left on for 6 hours. How much total power do they use together?
    8. A 1 kW heater is used for 30 minutes. How many kilowatt-hours are consumed?
    9. Which formula is used to calculate electric power?
    10. A 5 kW heater is connected to a 240 V supply. Approximately what current does it draw?

    Related topics